Ice Exchange interface
The Platform can be easily setup to connect to ICE Exchange to download ICE trades to the system manually or automatically.
There are several configurations that are required before ICE Exchange Interface can be used.
How ICE Exchange trade works
ICE Exchange Interface Setup
ICE Exchange Interface Mappings
How ICE Exchange Trade Works
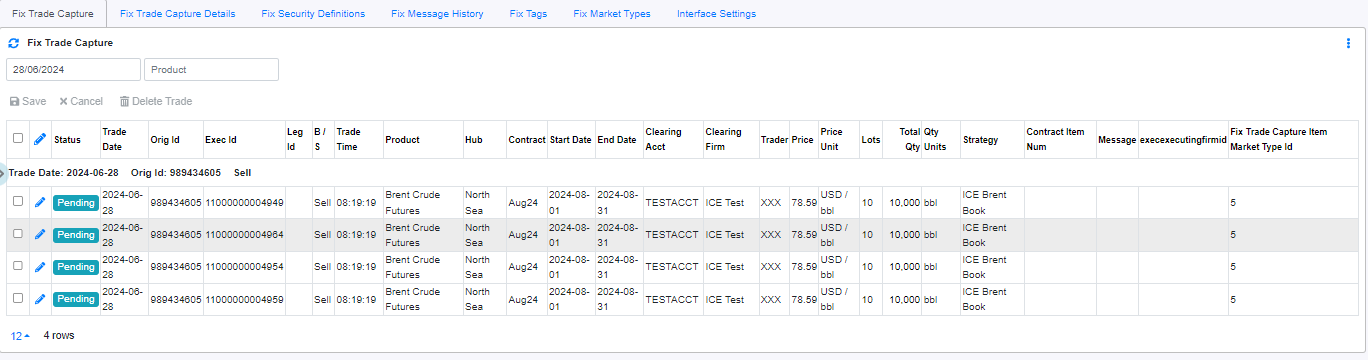
Once ICE Exchange Interface is setup (with Trade Capture Real Time is checked), when new trades are executed on ICE, you will be able to view the list of trades done on ICE in System Admin -> Exchange Interfaces ->Fix Trade Capture. The trade will be in "Pending" Status.
The trade will automatically appear here if it was set to "Trade Capture Real Time" is set to true.
After the FIX Trade is downloaded from ICE, contract can be created from the downloaded FIX Trade data either automatically or manually.

To manually create the contracts, .
1. Go to System Admin -> Exchange Interfaces -> Interfaces.
2. Tick the Interface line and select the date of the downloaded FIX Trades that will be creating contracts from.
3. Click on  to create the contracts.
*The contract creation will be using the Interface Mappings Setup.*
*Contract creation can be automated by changing the setting in Interface Settings.*
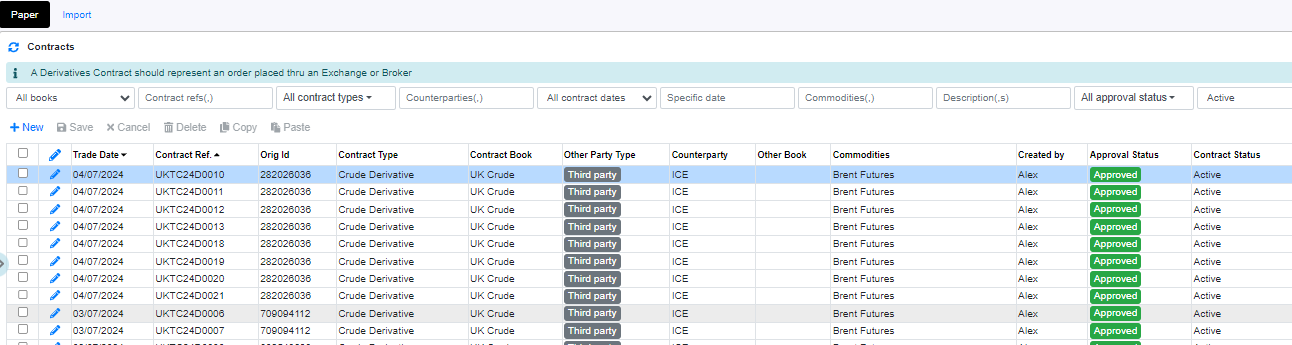
Once the contract are created using the , the contract will appear in Trading -> Paper. The contracts that are created from ICE Interface will automatically be approved.
For Contracts that used "Avreage Fills by Orig Id" from Contract Struture Setup. The breakdown of the filled qty/price can be seen in "Fill" Tab in Trading -> Paper

ICE Exchange Interface Setup
From Interface view,
To setup ICE Exchange Interface,
Interface Settings
To Setup Interface Settings, go to System Admin -> Exchange Interfaces -> Interface Settings.

From the Interface Settings,
1. Click on  to edit the line.
2. In Application Id, not to be changed.
3. In User Id, enter the User Id provided by ICE. Typically, it is the account which can execute a trade on ICE.
4. In Password, enter the Password provided by ICE.Typically, it is the account which can execute a trade on ICE.
5. In Credentials, not to be changed.
6. In Fix Sender Comp Id, not to be changed.
7. In Fix Target Comp Id, not to be changed.
8. In Socket Connect Host, not to be changed.
9. In Socket Connect Port, not to be changed.
10. In Trade Capture Real-Time?, check this box if you wish to capture the trade done on ICE real time. Real time refers to as soon as the contract on ICE is filled, it will be downloaded.
11. In Trade Contract Real-Time?, check this box if you wish the trade downloaded from ICE to be created as a contract in the Platform real time.
* The current design of ICE Exchange Interface will first download the trade from ICE in this view(System Admin->Exchange Interface->Fix Trade Capture).*
12. In Log Messages?, check this box if you wish to keep the log messages.
13. In Active?, check this box to make this line active.
14. Click  to confirm update.
Fix Market Types
To Setup Fix Market Types, go to System Admin -> Exchange Interfaces -> Fix Market Types.
Market Types are used to indicate what are the Market Types that you will trade on ICE which requires trade download to the CoreTRM platform. In this view, there are some precreated commonly used market types.New Market Types can be added.

From the Fix Market Types,
1. Click on  to create a new line.
2. In Market Type Id, enter the market type Id. The list is typically available in the FIX API documentation.
3. In Market Type Name, enter the name of the market type.
4. In Comments, enter any comments for the market type if applicable.
5. In Active?, check this box to make this line active.
6. Click to confirm update.
Fix Tags
There is no setup required for Fix Tags. The setup in this view is configured to work directly with ICE Exchange.
Fix Security Definition
To start using ICE Exchange Interface, we have to download the Security Definition of the product that you are trading on ICE Exchange.
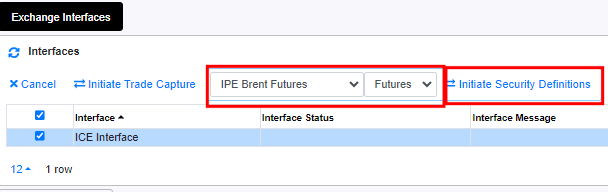
To start downloading Security Definition,
1. Select the Product from the dropdown list.
2. Select the type of Derivatives from the dropdown list.
3. Click on  .
.
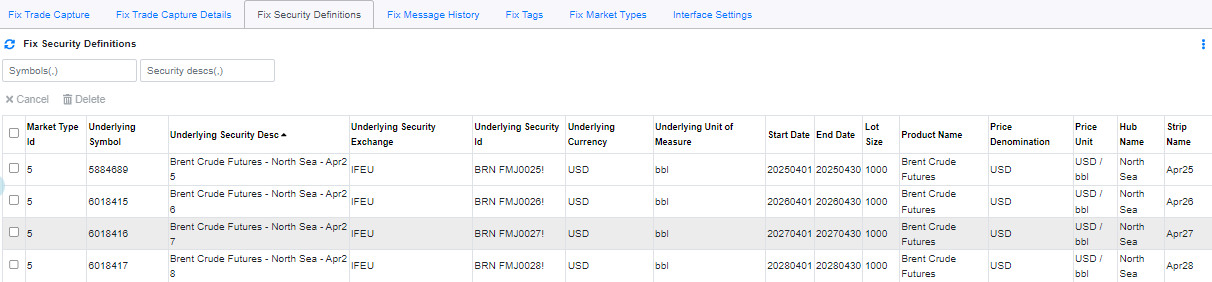
4. Once the Product Security Definition is downloaded, the information can be found in System Admin -> Exchange Interfaces -> Fix Security Definition.
Interface Mappings
After the interface setup is done. The next configuration will be Interface Mappings. Interface Mapping allows the platform to create the contract in the Platform after the Fix Trade is downloaded from ICE Exchange.
Strategies and Book
Strategies and Books mappings allows you to map the book and strategies of the contract when the contract is created using Fix Trade that was downloaded.
To Setup Strategies and Books mappings, go to Trading -> Paper -> Import -> Interface Mappings -> Strategies and Books
From Strategies and Books view, Strategies,
1. Click on to create a new line.
2. In From Item Ref, select the from Item Ref to use to setup the rule to apply to default the Strategy of the contract.
3. In From Value, select the from value to use to setup the rule to apply to default the Strategy of the contract.
4. In From Item Ref2, select the from Item Ref2 to use to setup the rule to apply to default the Strategy of the contract.
5. In From Value2, select the from value2 to use to setup the rule to apply to default the Strategy of the contract.
6. In From Item Ref3, select the from Item Ref3 to use to setup the rule to apply to default the Strategy of the contract.
7. In From Value3, select the from value3 to use to setup the rule to apply to default the Strategy of the contract.
8. In To Strategy Num, select the Strategy Num (displayed in Strategy Name) to be used for this rule.
9. In To Strategy Name, this display the Strategy Name of the selected Strategy Num.
10. Click to confirm creation.
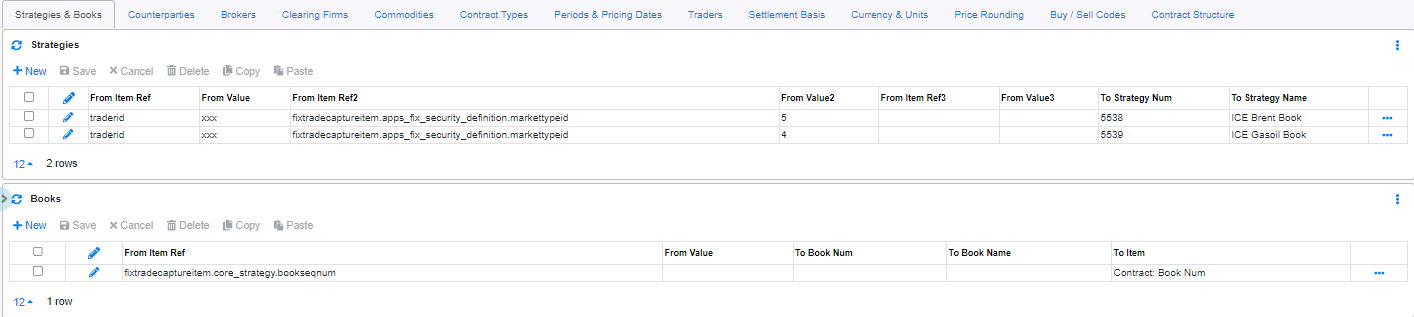
For Example, the below example uses trader id and the markettypeid as a rule to default the Strategy Num to be used when the contract is created.
When the traderid is XXX and markettypeid is 5, the contract will use Strategy: ICE Brent Book.
When the traderid is XXX and markettypeid is 4, the contract will use Strategy: ICE Gasoil Book.

Counterparties
Counterparties mappings allows you to map the counterparty of the contract when the contract is created using Fix Trade that was downloaded.

To Setup Counterparties, go to Trading -> Paper -> Import -> Interface Mappings -> Counterparties.
From Counterparties,
1. Click on to create a new line.
2. In From Item Ref, select the from Item Ref to use to setup the rule to apply to default the counterparty of the contract.
3. In From Value, select the from value to use to setup the rule to apply to default the Counterparty of the contract.
4. In To Counterparty Num, select the Counterparty Num (displayed in Counterparty Name) to be used for this rule if applicable.
5. In To Counterparty, this display the Counterparty Name of the selected Counterparty Num.
6. Click to confirm creation.
For Example, the above example uses executingfirm id as a rule to default the Counterparty Num to be used when the contract is created.
When the executingfirm id is blank, the contract will use Counterparty name: ICE.
Brokers
Brokers mappings allows you to map the Brokers of the contract when the contract is created using Fix Trade that was downloaded.
To Setup Brokers, go to Trading -> Paper -> Import -> Interface Mappings -> Brokers.
Brokers mappings allows you to map the Brokers of the contract when the contract is created using Fix Trade that was downloaded.

From Brokers,
1. Click on to create a new line.
2. In From Item Ref, select the from Item Ref to use to setup the rule to apply to default the Broker of the contract.
3. In From Value, select the from value to use to setup the rule to apply to default the Broker of the contract.
4. In To Broker Num, select the Broker Num (displayed in Broker Name) to be used for this rule if applicable.
5. In To Broker, this display the Broker Name of the selected Broker Num.
6. Click to confirm creation.
For Example, the above example uses executingfirm id as a rule to default the Broker Num to be used when the contract is created.
When the executingfirm id is blank, the contract will use Broker name: Broker 1.
Clearing Firms
Clearing Firms mappings allows you to map the Clearing Counterparty of the contract when the contract is created using Fix Trade that was downloaded.
To Setup Clearers, go to Trading -> Paper -> Import -> Interface Mappings -> Clearing Firm

From Clearing Firms,
1. Click on to create a new line.
2. In From Item Ref, select the from Item Ref to use to setup the rule to apply to default the Clearing Counterparty of the contract.
3. In From Value, select the from value to use to setup the rule to apply to default the Clearing Counterparty of the contract.
4. In To Broker Num, select the Clearing Firm Num (displayed in Clearing Firm Name) to be used for this rule if applicable.
5. In To Broker, this display the Clearing Firm Name of the selected Clearing Firm Num.
6. Click to confirm creation.
For Example, the above example uses executingfirm id as a rule to default the Clearing Firm Num to be used when the contract is created.
When the executingfirm id is blank, the contract will use Clearing Counterparty: Clearer 1.
Commodities
Commodities mappings allows you to map the Commodities of the contract when the contract is created using Fix Trade that was downloaded.
To Setup Commodities, go to Trading -> Paper -> Import -> Interface Mappings -> Commodities

From Commodities,
1. Click on to create a new line.
2. In From Item Ref, select the from Item Ref to use to setup the rule to apply to default the Commodity of the contract.
3. In From Value, select the from value to use to setup the rule to apply to default the Commodity of the contract.
4. In From Item Ref2, select the from Item Ref2 to use to setup the rule to apply to default the Commodity of the contract.
5. In From Value2, select the from value2 to use to setup the rule to apply to default the Commodity of the contract.
6. In To Commodity Num, select the Commodity Num (displayed in Commodity Name) to be used for this rule.
7. In To Commodity Name, this display the Commodity Name of the selected Commodity Num.
8. Click to confirm creation.
For Example, the below example uses product name and the cficode as a rule to default the Commodity Num to be used when the contract is created.
When the productname is Brent Crude Futures and cficode is FXXXXX, the contract will use Commodities: Brent Futures.
When the productname is LS Gas Oil Futures and cficode is FXXXXX, the contract will use Commodities: Low Sulphur Gasoil Futures.

Contract Types
Contract Types mappings allows you to map the Contract Types of the contract when the contract is created using Fix Trade that was downloaded.
To Setup Contract Types, go to Trading -> Paper -> Import -> Interface Mappings -> Contract Types

From Contract Types,
1. Click on to create a new line.
2. In From Item Ref, select the from Item Ref to use to setup the rule to apply to default the Contract Types of the contract.
3. In From Value, select the from value to use to setup the rule to apply to default the Contract Types of the contract.
4. In To Contract Types Num, select the Contract Types Num (displayed in Contract Types Name) to be used for this rule if applicable.
5. In To Contract Types, this display the Contract Types Name of the selected Contract Types Num.
6. Click to confirm creation.
For Example, the above example uses product name as a rule to default the Contract Types Num to be used when the contract is created.
When the product name is Brent Crude Futures, the contract will use Contract Types: Crude Derivatives.
Period and Pricing Dates
Period and Pricing Dates mappings allows you to map the Period and Pricing Dates of the contract when the contract is created using Fix Trade that was downloaded.
To Setup Period and Pricing Dates, go to Trading -> Paper -> Import -> Interface Mappings -> Period and Pricing Dates

From Contract Types,
1. Click on to create a new line.
2. In From Item Ref, select the from Item Ref to use to setup the rule to apply to default the Period and Pricing Dates of the contract.
3. In From Value, select the from value to use to setup the rule to apply to default the Period and Pricing Dates of the contract.
4. In To Period Num, select the Period Num to be used for this rule if applicable.
5. In To Period Name, this display the Period Name of the selected Period Num.
6. Click to confirm creation.
For Example, the above example uses strip name as a rule to default the Period Num to be used when the contract is created.
When the stripname is Aug23, the contract will use Period Name: Aug23.
Traders
Traders mappings allows you to map the Trader of the contract when the contract is created using Fix Trade that was downloaded.
To Setup Traders, go to Trading -> Paper -> Import -> Interface Mappings -> Traders

From Traders,
1. Click on to create a new line.
2. In From Item Ref, select the from Item Ref to use to setup the rule to apply to default the Trader of the contract.
3. In From Value, select the from value to use to setup the rule to apply to default the Trader of the contract.
4. In To User Num, select the User Num to be used as Trader for this rule if applicable.
5. In To User Name, this display the User Name of the selected User Num.
6. Click to confirm creation.
For Example, the above example uses traderid as a rule to default the User Num to be used as Trader when the contract is created.
When the traderid is trader1, the contract will use Trader: Admin.
Settlement Basis
Settlement Basis mappings allows you to map the Settlement Basis of the contract when the contract is created using Fix Trade that was downloaded.
To Setup Settlement Basis, go to Trading -> Paper -> Import -> Interface Mappings -> Settlement Basis

From Settlement Basis,
1. Click on to create a new line.
2. In From Item Ref, select the from Item Ref to use to setup the rule to apply to default the Settlement Basis of the contract.
3. In From Value, select the from value to use to setup the rule to apply to default the Settlement Basis of the contract.
4. In To Settlement Basis Num, select the Settlement Basis Num to be used as Settlement Basis for this rule if applicable.
5. In To Settlement Basis Name, this display the Settlement Basis Name of the selected Settlement Basis Num.
6. Click to confirm creation.
For Example, the above example doesnt use any from Item Ref and Value as a rule to default the User Num to be used as Settlement Basis when the contract is created.
In other words, the contract will always be defaulted with Settlement Basis: Margin.
Currency and Units
Currency and Units mappings allows you to map the Currency and Units of the contract when the contract is created using Fix Trade that was downloaded.
To Setup Currency and Units, go to Trading -> Paper -> Import -> Interface Mappings -> Currency and Units
From Setlement Currency,
1. Click on to create a new line.
2. In From Item Ref, select the from Item Ref to use to setup the rule to apply to default the Settlement Currency of the contract.
3. In From Value, select the from value to use to setup the rule to apply to default the Settlement Currency of the contract.
4. In To Currency, select the Settlement Currency to be used as Settlement Currency for this rule if applicable.
5. Click to confirm creation.
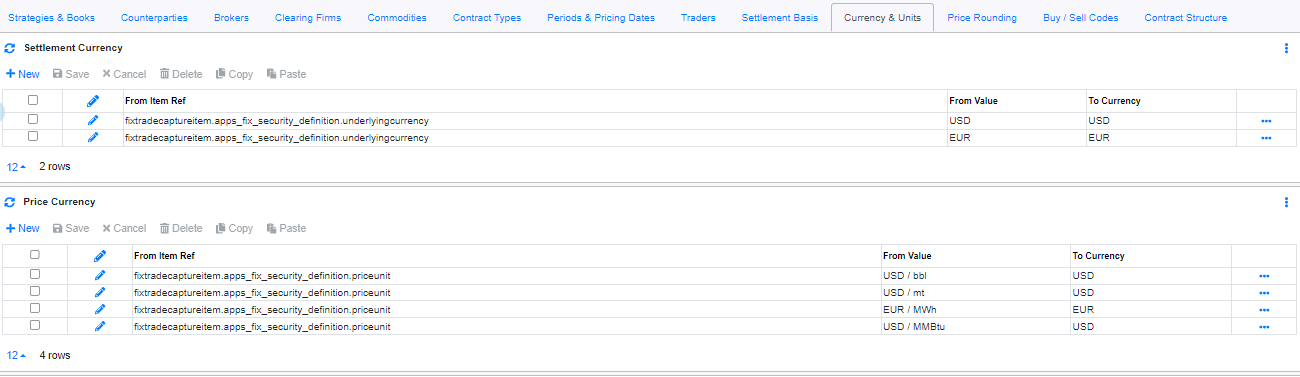
For Example, the above example uses underlyingcurrency as a rule to default the Settlement Currency Codes to be used when the contract is created.
When the underlyingcurrency is USD, the contract will use Settlement Currency: USD.
From Price Currency,
1. Click on to create a new line.
2. In From Item Ref, select the from Item Ref to use to setup the rule to apply to default the Price Currency of the contract.
3. In From Value, select the from value to use to setup the rule to apply to default the Price Currency of the contract.
4. In To Currency, select the Price Currency to be used as Price Currency for this rule if applicable.
5. Click to confirm creation.
For Example, the above example uses priceunit as a rule to default the Price Currency Codes to be used when the contract is created.
When the priceunit is USD/bbl, the contract will use Price Currency: USD.
The same concept of setup is applied to Price Units and Quantity Units mapping.
Price Rounding
Price Rounding mappings allows you to map the Price Rounding of the contract when the contract is created using Fix Trade that was downloaded.
To Setup Price Rounding, go to Trading -> Paper -> Import -> Interface Mappings -> Price Rounding

From Price Rounding,
1. Click on to create a new line.
2. In From Item Ref, select the from Item Ref to use to setup the rule to apply to default the Price Rounding of the contract.
3. In From Value, select the from value to use to setup the rule to apply to default the Price Rounding of the contract.
4. In To Price Rounding, select the Price Rounding to be used as Price Rounding for this rule if applicable.
5. Click to confirm creation.
For Example, the above example uses markettypeid as a rule to default the Price Rounding to be used when the contract is created.
When the markettypeid is 5, the contract will use Price Rounding: 3.
Buy/Sell Codes
Buy/Sell Codes mappings allows you to map the Buy/Sell Codes of the contract when the contract is created using Fix Trade that was downloaded.
The default setup in this view will correctly mapped the Buy/Sell codes.
To Setup Buy/Sell Codes, go to Trading -> Paper -> Import -> Interface Mappings -> Buy/Sell Codes

From Buy/Sell Codes,
1. Click on to create a new line.
2. In From Item Ref, select the from Item Ref to use to setup the rule to apply to default the Buy/Sell Codes of the contract.
3. In From Value, select the from value to use to setup the rule to apply to default the Buy/Sell Codes of the contract.
4. In To Buy/Sell Codes, select the Buy/Sell Codes to be used as Buy/Sell Codes for this rule if applicable.
5. Click to confirm creation.
For Example, the above example uses side as a rule to default the Buy/Sell Codes to be used when the contract is created.
When the side is 1, the contract will use Buy/Sell Codes: B.
Contract Structure
Contract Structure allow you to setup the rule for how the FIX trades that are downloaded will be created in the CoreTRM Platform. In addition, it also allows you to map any additional information from the FIX trade to the contract creation.
To Setup Contract Struture, go to Trading -> Paper -> Import -> Interface Mappings -> Contract Structure

For Contract structure,
The Contract Action has 2 options:
"Create New Contract and group using Orig Id" - means one contract will be created for all the trade capture item that is downloaded.
"Create Contract for each Trade Capture Item" - means one contract will be created for every trade capture item that is downloaded.
For "Avreage Fills by Orig Id" -
If True, means one contract will created for all Fill quantity.
If False, means one contract will created for every Fill quantity.
For Example,
A Buy Futures contract for Sep24/Oct24 with quantity 50 lots and this is filled by 25 lots, 5 lots and 20 lots.
If "Create New Contract and group using Orig Id" and and "Avreage Fills by Orig Id" is True:
Then, 1 contract will be created with 2 Contract Item: 1 Buy for 50 lots and 1 for Sell for 50 lots.
For Example,
A Buy Futures contract for Sep24/Oct24 with quantity 40 lots and this is filled by 20 lots and 20 lots.
If "Create Contract for each Trade Capture Item" is selected and "Avreage Fills by Orig Id" is False:
Then, 4 contracts will be created: 2 Buy Contracts for 20 lots each, 2 Sell Contracts for 20 lots each.
For Example,
A Buy Futures contract for Sep24/Oct24 with quantity 50 lots and this is filled by 25 lots, 5 lots and 20 lots.
If "Create Contract for each Trade Capture Item" and and "Avreage Fills by Orig Id" is True:
Then, 2 contracts will be created: 1 Buy Contract for 50 lots and 1 for Sell Contract for 50 lots.
For Fixed Mappings,
Currently, there are an existing lists of default mapping that have been setup to map the remaining information. New items can be added as required.
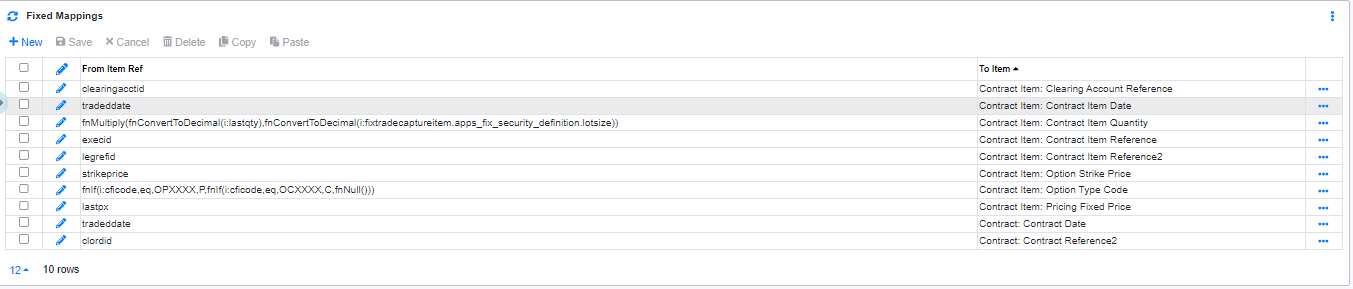
To add new items,
1. Click on to create a new line.
2. In From Item Ref, select the from Item Ref to use to setup the rule to apply to default To the Item Ref of the contract.
3. In To Item Ref, select the To Item Ref to be used as the Item ref for this rule if applicable .
4. Click to confirm creation.
After Interface Settings and Interface Mapping is setup, we will be able to initiate the connection from CoreTRM to ICE Exchange.
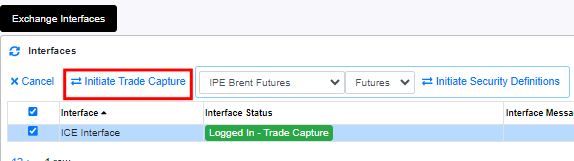
To start the ICE Exchange connection,
1. Select the Interface row.
2. Click on  to start the connection.
3. Once the connection is established successfully, the "Interface Status" will changed to "Logged In - Trade Capture".
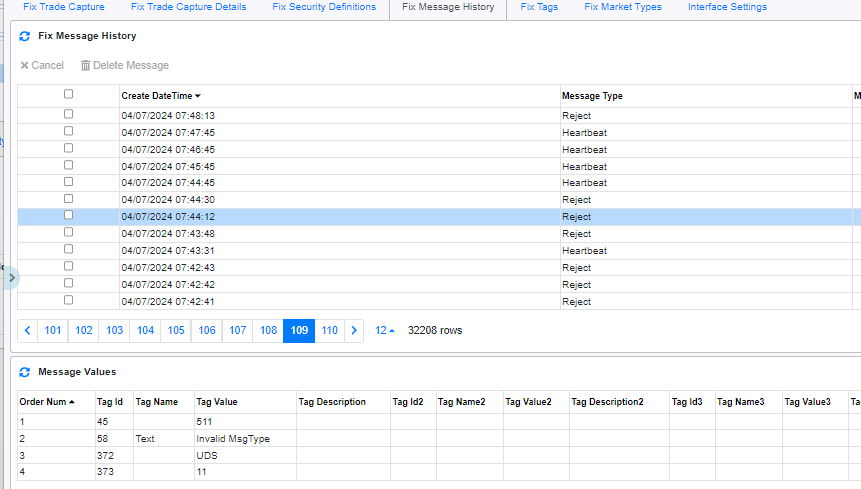
In the event there are issues with connecting to ICE Exchange, you can view the log in System Admin -> Exchange Interface -> Fix Message History