Alert Builder
CoreTRM allows each tenant to create alerts based on the data available in system. The alerts can be sent by schedule or by approvals. The alert is sent via email and has a default sender email address of alerts@coretrm.com.
CoreTRM comes with a set of default Approvals and Operations Alerts. Depending on client requirement, some of the existing alerts can be activated. Customised alerts can also be created using Alert Builder.
Creating an alert
Example of 2 DataObjects/Tables Email Alert
To access Alert Builder go to System Admin and then to the Alert Builder tab.
Creating an alert
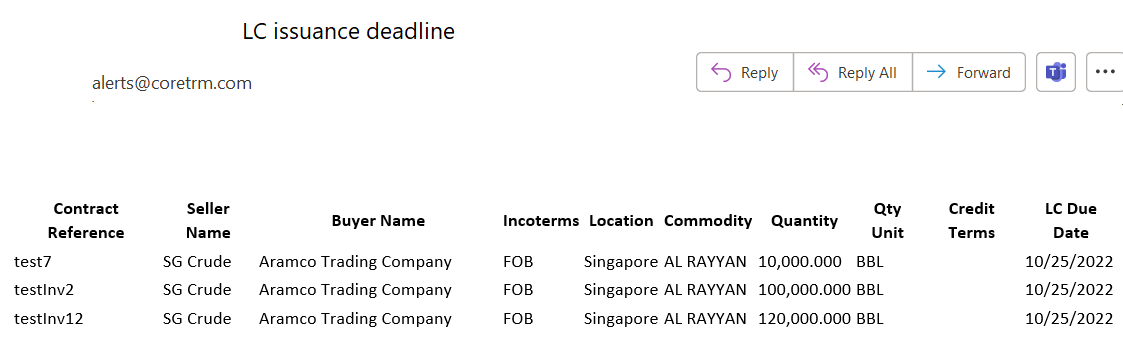
For example, creating an alert for LC issuance deadline. The alert will trigger if the LC issuance due date is less than 7 days from today. The alert will provide the following information:
Contract Reference, Seller Name, Buyer name, Incoterms, Location, Commodity, Quantity, Unit, Credit Terms and LC Due Date.
To create a new alert:
- Navigate to System Admin then Alert Builder.
- From the Alerts View, click on
 to create a new line.
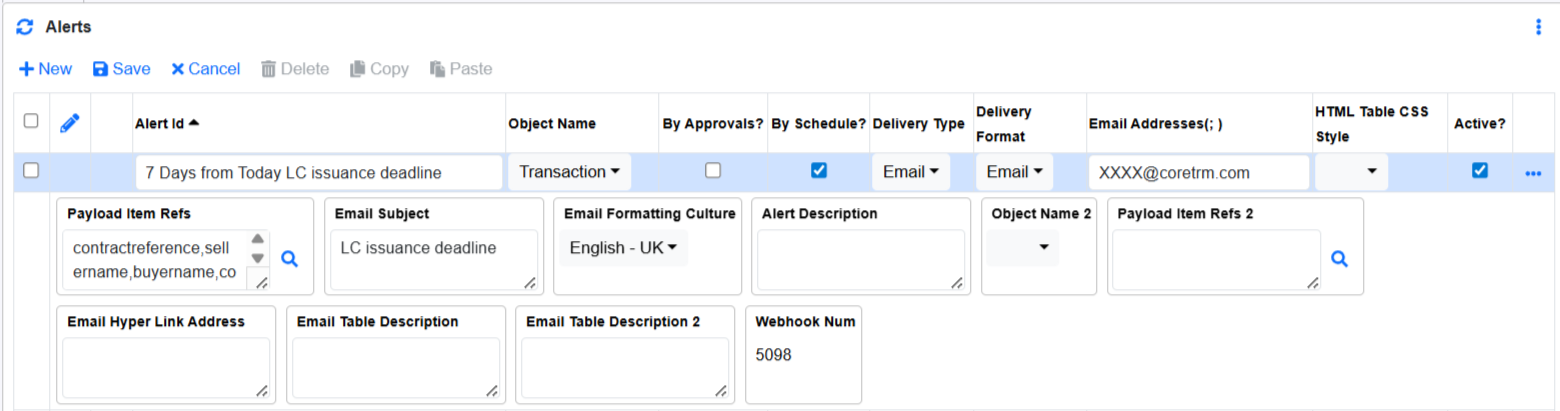
 - In Alert id, enter the name of the Alert. Typically, it can be used to describe what is the alert do. In our example, 7 Days from Today - LC issuance deadline.
- In Object Name, select the object from where the alert should retrieve the data. In our example, Transactions object will be used since transactions object has a calculated LC issuance Due Date(credittermduedate).
- In By Approvals?, tick the box if the alert is triggered when a change of approvalstatus happen.
- In By Schedule?, tick the box if the alert is triggered on a schedule basis. In our example, we will tick this box.
- In Delivery Type, email is the only option available currently.
- In Delivery Format, email is the only option available currently.
- In Email Addresses(;), enter the email address of users who will be receiving this alert.
- In Active?, tick this box to set the alert active.
- In Payload Item Refs, select the Item ref to be included in the email body. In our example, Contract Reference, Seller Name, Buyer name, Incoterms, Location, Commodity, Quantity, Unit, Credit Terms and LC Due Date will be included in the email body.
- In Email Subject, enter the email subject. This will appear in the email subject when the user received the alert email. In our example, LC issuance deadline - 7 Days from Today.
- In Email Formatting Culture, select the email formatting culture. This mainly affect date display.
- In Object Name 2, if you required 2 table to be displaysed in the alert email, select the 2nd data object where the alert should retrieve the data from.
- In Payload Item Refs2, if you have selected dataobject 2, select the Item ref to be included in the second table in the email.
- In Email Hyper Link Address, a hyperlink can be shown as part of the email. The hyperlink will be at the end of the email.
- In HTML Table CSS Style, select "Dark" to make the table header row with black background. Leaving it blank will use white background.
- In Email Table Description, enter a description for first data object table. It will appear on top of the first table in the email.
- In Email Table Description 2, enter a description for second data object table. It will appear on top of the second table in the email.
- In Alert Description, enter any applicable alert description.
- In Webhook Num, unique number for this alert. This is generated after the alert is saved.
- Then, click on
 to confirm the creation.
 - To edit alert details after creation, Click
 to edit.
After the alert is created with the payload item ref required, we can now setup the criteria from which the system will select the data to be sent out. This can be set in the "Filters" tab.
To create a new alert, in Filters tab:
- From the Filters tab, click on to create a new line.
- In Order, indicate the order number of the filter criteria.
- In And Or, if there is more than 1 filter criteria, "And" or "Or" can be used to indicate the filter crieria relationship.
- In Left Brackets, left brackets can be included if two or more criteria is group together to form a filter criteria.
- In Left Item Ref., select the Left Item Ref to be used for this filter criteria.
- In Condition, select the condition to be used for this filter criteria.
- In Right Item Ref., select the Right Item Ref if the condition is comparing with another Item Ref value. Either Right Item Ref. or Right Value is to be used.
- In Right Value, enter a Right Value if the condition is to compare with a fixed value. Either Right Item Ref. or Right Value is to be used.
- In Right Brackets, right brackets can be included if two or more criteria is group together to form a filter criteria..
- In Grouping Filters?, check the box if the filter criteria is involved a function that required group. Example of functions: fnSum, fnMax, fnMin, etc. Grouping filter works similar to the SQL Having clauses.
- In Active?, check the box if this line of filter criteria is to be active.
- Click to confirm creation.
- To edit filter details after creation, Click to edit.
- In our example, since we are sending out alerts for LC Issuance Due date 7 days from Today, we will use the following criteria:
For Example, brackets can be used to indicate more than one criteria form part of one criteria.

*Conditions available are "contains", "equals", "greater than", "greater than or equal to", "in", "less than", "less than or equal to", "not contains", "not equals" and "not in".
*Example of Grouping Filters can be found here.*
100. Commodity type group equal to physical. In our example, we are only looking at Physical Trade.
200. Commodity type group number not equal to 8. This will exclude Derivatives trade from the selection.
300. A credit instrustment is selected.
400. The LC Issuance Due Date is less than Today plus 7 days.
500. Inventory indicator is False. To exclude any Inventory Trade.
600. Quantity of the trade is not equal to zero.

After filter criteria are setup, we can also rename and format each Item Ref that appear in the email alert. This can be done in "Item Overrides" tab.
To create a new alert, in Item Overrides tab:
- From the Item Overrides tab, click on to create a new line.
- In Item Reference, select the Item Refs that you wish to make a name change, set the decimal places or date format. The Item References use here should be of same name as those that are used in the "Payload Item Refs" in Alerts view.
- In Display Name, enter the name to display for this Item Ref in the email if applicable.
- In Decimal Places, enter the number of decimal places to display for this Item Ref in the email if applicable.
- In Date Format, .select the date format to display for this Item Ref in the email if applicable
- Click to confirm creation.
- To edit item overrides details after creation, Click to edit.
- In our example, we can rename all the item ref and for credittermduedate, we can set to Date Format: Date. For quantity, we can set to 3 decimal places.

Below is an example of how the email is shown:
After an alert is setup, we will need to setup a schedule task function that will trigger the email from the system.
This is done using the Schedule Task Function in the system. To access Schedule Task go to System Admin -> System Admin -> Schedule Task Tab.
*Note that access to this view maybe be restricted. Contact CoreTRM support if access is required.*

To create a new schedule task, in schedule task view:
- Click on to create a new line.
- In Task Description, enter a description for the task.
- In Max(Last Run at DateTime), this shows the last run date time.
- In Run on Monday, tick this box if the schedule task is to be run on this day.
- In Run on Tuesday, tick this box if the schedule task is to be run on this day.
- In Run on Wednesday, tick this box if the schedule task is to be run on this day.
- In Run on Thursday, tick this box if the schedule task is to be run on this day.
- In Run on Friday, tick this box if the schedule task is to be run on this day.
- In Run on Saturday, tick this box if the schedule task is to be run on this day.
- In Run on Sunday, tick this box if the schedule task is to be run on this day.
- In Run at Time Hour, enter the time (Hour) of the day to run the schedule task. The time used is based on UTC Server Time.
- In Run at Time Minutes, enter the time (Minutes) of the day to run the schedule task.The time used is based on UTC Server Time.
- In Repeat Period, enter the repeat period if applicable.
- In Repeat Period Type, select the repeat period type if applicable.
- In Run as User Name, select the user name to use to run the schedule task. Typically, it will be schedule.
- In Active?, .tick this box if this schedule task is active.
- Click to confirm creation.
- To edit schedule task details after creation, Click to edit.
In the example above, the schedule task is set to run everyday from Monday to Friday at 01:50am UTC time. For testing, you can select the select task and click on  to trigger the schedule task immediately.
After an alert detais are setup, we will need to setup a schedule task function that will trigger the email from the system.

To create a new task steps, in task step tab:
- Click on to create a new line.
- In Task Step Order Num, enter step order number for the task step.
- In Task Step Description, enter a description for the task step.
- In Method Id, enter the Method Id for the task step. In our example, to trigger the schedule task, method id is "ScheduledWebhooks".
- In Method Parameters, enter parameter for the method. In our example, we will only trigger alert "7 Days from Today - LC issuance deadline" for this schedule task. Therefore, we will use "filter=webhookseqnum.eq.5009".
- In Active Indicator, tick this box if this task step is active..
- Click to confirm creation.
- To edit task steps details after creation, Click to edit.
Alert's webhookseqnum can be found in Alerts that is created in the Alerts view.
To check that the schedule task is run and completed, click on the "Task History" tab of the schedule task.

Example of 2 DataObjects/Tables Email Alert
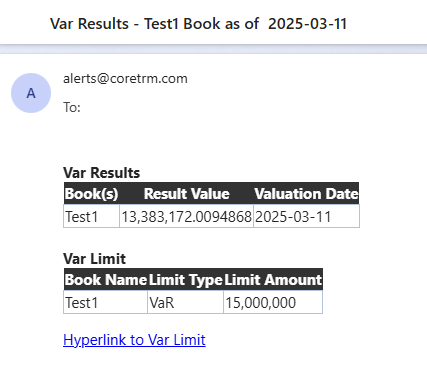
Below is an example of an email alert containing 2 dataobjects: Var Results and Trading Limit. In this email, it uses HTML Table CSS Style: Dark, Email Table Description, Email Table Description2, Email Hyperlink Address and dynamic Email Subject.
The Alert Setup is per below:
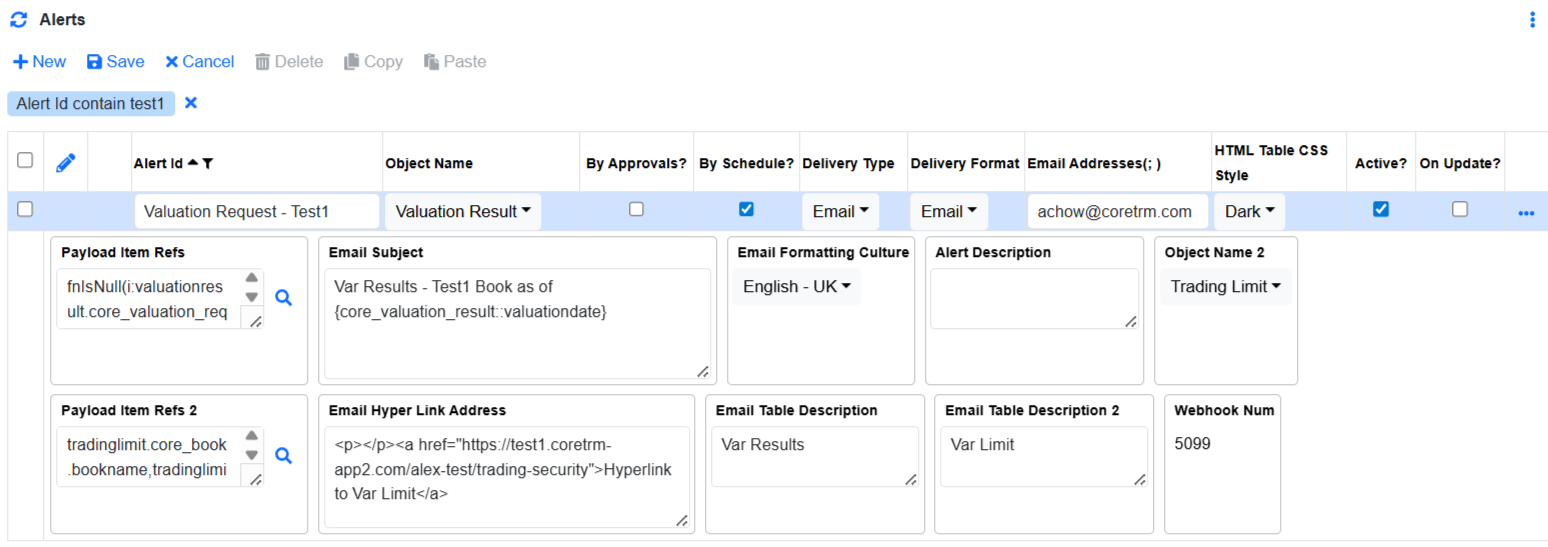
In the HTML Table CSS Style, Dark is selected to show the Black Header Background.
In Object Name, Valuation Results is selected and in Payload Item Ref select the column to be appeared in 1st table.
In Object Name 2, Trading Limits is selected and in Payload Item Ref2 select the column to be appeared in 2nd table.
In Email Table Description, enter the text to appear on top of 1st table.
In Email Table Description2, enter the text to appear on top of 2nd table.
In Email Subject, enter the email subject. If dynamic value needs to be used, {databojectname::itemreference} can be used. The itemreference used has to be in the payload itemref of Object Name for it to appear.
In Email Hyper Link Address,enter the hyperlink and text here. It uses html hyperlink reference.
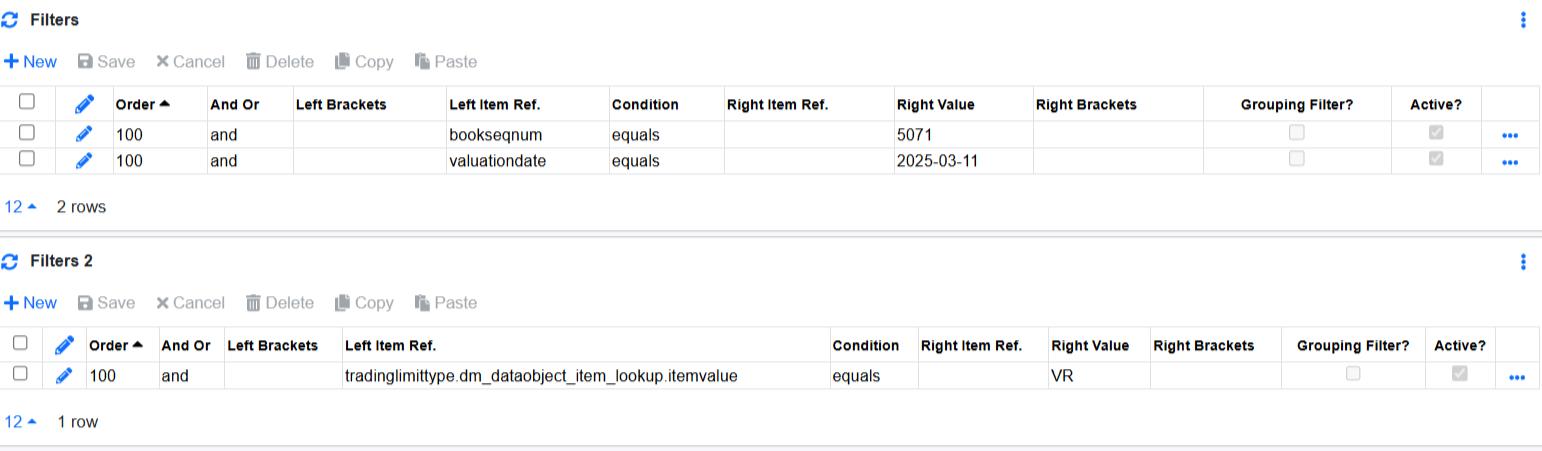
When Object Name 2 is selected and saved, Filter 2 appeared. Filter 2 is used to filter data for Object Name 2.
**In order to use the object data, 1 filter is required per Object.**
**Item Override is used for both Object Name and Object Name 2.**
Example of the Email Alert is below: