Settlement Approval
The CoreTRM Platform can be configured with Settlement Approval. The Settlement Approval can be used as a control before certain action can be done after a settlement that is created.
Settlement Approval Process
Settlement Approval Setup
Settlement Approval Process
After the Settlement is created, the Approval Status will be blank.
To start the approval process for a settlement, in settlement view:
- Select the settlement and click on
 button.
 - Once the settlement is in "Awaiting Approval" status, the Approver can now either approve or reject the settlement.
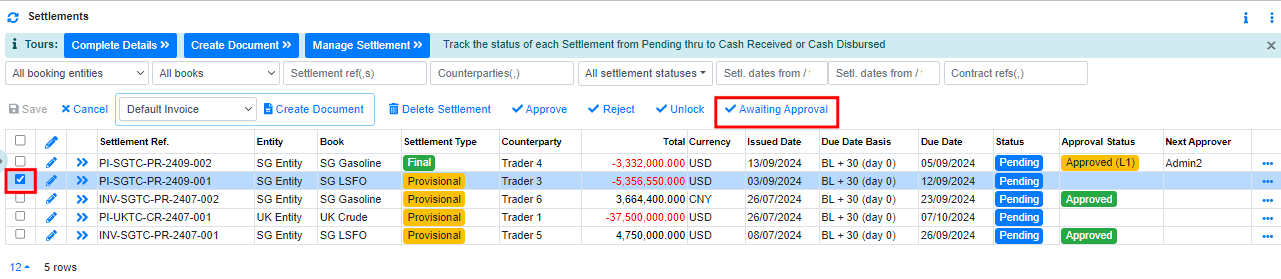
When the button is clicked, CoreTRM will search for the next approver name based on the approval rule setup below.
To approve/reject a settlement, in settlement view:
- Select the settlement that you wish to approve, the approval status of the settlement will need to be "Awaiting Approval".
- Once the settlement is in "Awaiting Approval" status, the Approver can now either approve or reject the settlement.
- The approver can approve the settlement by clicking on
 or to reject by clicking on
  button at the top of the settlement view.
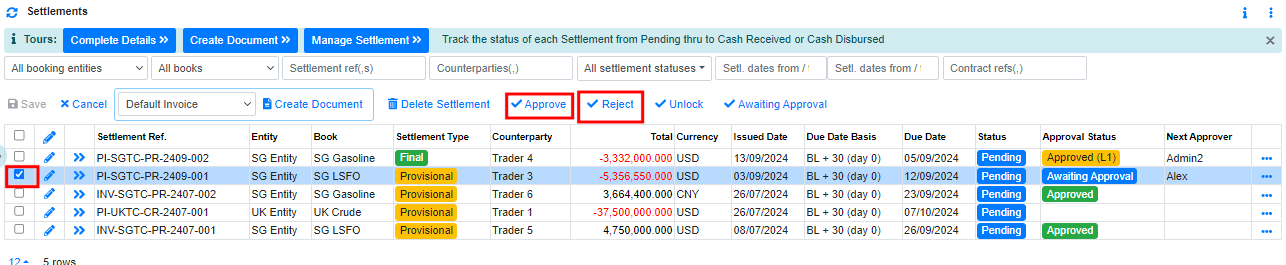
*Approval permission is required for clicking or button.*
When a settlement is in "Approved" Status, technically no changes can be made to the settlement. However, some fields are still able to be changed. In order to be able to made changes to all fields in the settlement after approval, the user will need to click on  to unlock the settlement.
To unlock a settlement for amendment, in settlement view:
- Select the settlement that you wish to unlock for amendment by checking the box in first column.
- Click on button at the top of the contact view.
*Approval permission is required for clicking button.*
Settlement Approval Setup
To setup settlement approval go to Security Data ->Trading Security -> Approvals -> User Team tab.
From Approval Rules view:

- Click on
 to create a new line.
 - In Book, select the applicable book in which you wish to setup the approval.
- In Contract Type Group, select the applicable contract type group. The group are either Physical or Derivative.
- In Type, select the applicable type. In our example, we are setting up settlement approval.
- In Sub Type, is used by contract approval. This can be blank.
- In Team, select the applicable team. Settlement Approval is setup using team, all the user setup in that team will be user with contract entry role permission.(Rights to click on button.
- In Approval Group, this is used for manually selecting the next approver in contract approval(applicable for some clients only).
- In Subtype Contract (Commodity), is used by contract approval. This can be blank.
- In Subtype Contract (Quantity Rules), is used by contract approval. This can be blank.
- In Subtype Contract (Duration Rules), is used by contract approval. This can be blank.
- In Subtype Settlement (Total Cash Flow), this is to indicate the Total Cash Flow amount for which an approval is required. The options are: <15m and >=15.
- Click
 to confirm creation.
 - To edit approval rule details after creation, Click
 to edit.
In CoreTRM, settlement approvals are setup by book, contract type group, Type and Subtype Settlement (Total Cash Flow). If all book in the system is to have same approval rules, the higher hierachy book can be used. Once a higher Hierachy book (parent book) is used, all sub book (child book) under this parent book will have same approval rules.
In CoreTRM, for the same book, you can setup different approval rule for physical or derivative.
If your company settlement approval is not based on teams, you can setup one team and assign all user to that team.
*Team are setup below.*
Setting up User Team
To setup user team go to Security Data -> Trading Security -> Approvals -> User Team tab.
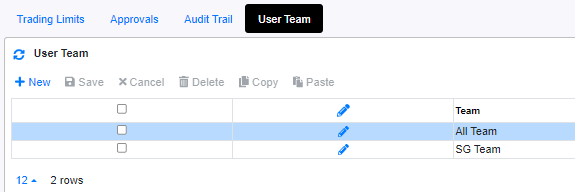
To setup up user team, in User Team view:
- Click on to create a new line.
- In Team, enter the name of the team.
- Click to confirm creation.
- To edit user team details after creation, Click to edit.
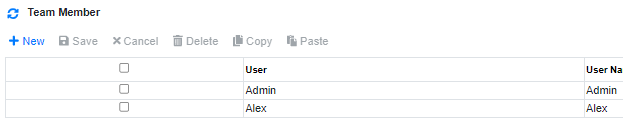
To setup up user team, in User view:
- Click on to create a new line.
- In User, select the user(s) belonging to this team.
- Click to confirm creation.
User setup under a team will have the rights to click on and button.

To continue setting up settlement approval, in Users view:
- Click on to create a new line.
- In Role, select the applicable role. In settlement approval setup, only "Approver" role is used.
- In User, this is not used for settlement approval.
- In Position, select the position that is assigned for approval.
- In Approval Level Num, enter the approval level num. For Example, 1 is the first approver and 2 is the 2nd approver.
- In Next Approval Level Num, enter the next approval num. This is used to indicate the next approver after this approver has approved the contract. For Example, on the line with Approval Level Num 1, indicate 2 for Next Approval Level Num to tell the system that after this approver, the next approver is level 2.
- Click to confirm creation.
- To edit approval user details after creation, Click to edit.
Approver: this role for the user who has permission to click on and .
User Position are setup in Security Data -> Security Model -> User Positions.
After User Position are created, you can go to security model -> User to assign each user with its positions.

To enable Settlement Approval function in your environment, kindly contact CoreTRM Support.