Interface Builder
CoreTRM Interface Builder allow each tenant to create both incoming and outgoing interface message schema and endpoints in the system. For Outgoing Interfaces, it allows you to create message template in different format which can be use to send to an external endpoint. For Incoming Interfaces, it allow you to create an interface endpoint in the system to receive custom data from another system. Currently, CoreTRM can deliver or receive messages in XML, JSON, HTML and Email Format. The delivery method available are HTTP, FTP and Email.
To access Interface Builder go to System Admin and then to the Interface Builder tab.
Creating Outgoing Interfaces
Creating Incoming Interfaces
Creating Outgoing Interfaces
CoreTRM allows you to create custom message template in XML, JSON, HTML and Email Format. We will use an example to show how to setup an outgoing interface.
In our example, we will send create a JSON outgoing message with some data from Contract Item Object.

To create a new Outgoing Interface, in Outgoing Interface view:
- Click on
 to create a new line.
 - In Interface Id, enter a unique interface id. In our example, we are using "Outgoing Interface Example".
- In Object Name, select an object from which the interface will retrieve data from. In our example, we are using "Contract Items".
- In By Call?, tick this box if this interface is triggered by call like a button. Using by call will required additional setup from CoreTRM. Please contact support.
- In By Schedule?, tick this box if this interface is triggered by schedule. Using by schedule will required additional setup from CoreTRM. Please contact support..
- In Delivery Type, select the applicable delivery type to be used for this interface. The Delivery Type available are HTTP, Email and FTP. In our example, we are using "HTTP".
- In Delivery Format, select the applicable delivery format to be used for this interface. The Delivery Format available are JSON, XML, Email and HTML. In our example, we are using "JSON"
- In Delivery Address, enter the destination endpoint address. In our example, we are using "localhost".
- In Do not Deliver?, tick this box if you are going to test the message output and do not want the message to be send to the delivery address.
- In Active?, tick this box to make this interface active.
- In Payload Item Refs, select the applicable Payload Items. This is used for Email delivery method.
- In Credentials, select a credential to use if the destination address requires authentication. The authentication type use here is basic authentication.
- In Test Parameters, enter any criteria for testing the interface. In our example, we are using contractseqnum as a testing criteria so that we can test message generated for specific contract.
- In Start Tag, enter any start tag to be generated as part of the message. This may be used as HTML start tag.
- In End Tag, enter any end tag to be generated as part of the message. This may be used as HTML end tag..
- In Email Subject, enter any applicable email subject. This is used specifically for delivery format "Email".
- In Webhook Num, display the unique webhook num generated for this interface after the interface details are created.
- Then, click on
 to confirm the creation.
 - To edit outgoing interface details after creation, Click
 to edit.
*Credentials are setup in System Admin-> Interface Builder-> Interface Credentials.*
After the interface data are setup above, next we will need setup the schema of the message.
Schema allow you to define the delivery format schema with specific tags required by the destination endpoint. To create schema items, we will have to first create a scheme group. Schema Group allow you to group items in groups for easy organisation.

Outgoing Interface Schema (Top)
To create a new Outgoing Interface, in Schema tab and Schema Groups:
- Click on to create a new line.
- In Order Num, enter an order number for this line. In our example, we are using "100".
- In Group Type, select an applicable group type. For outgoing interface, it will be "Send". For incoming interface, it will be "Responds".In our example, we are using "Send".
- In Start Tag, enter any start tag for this group schema. Typically, this is used for HTML delivery format. In our example, this is blank.
- In End Tag, . enter any end tag for this group schema. Typically, this is used for HTML delivery format. In our example, this is blank.
- In Repeating Group?, tick this box if the data should be repeated if there are more than 1 row of data. Typically, for contract items we will use Repeating group since one contract can have more than one contract item. In our example, we are will tick the box.
- In Active?, tick this box to set this schema group active.
- Then, click on to confirm the creation.
- To edit schema details after creation, Click to edit.
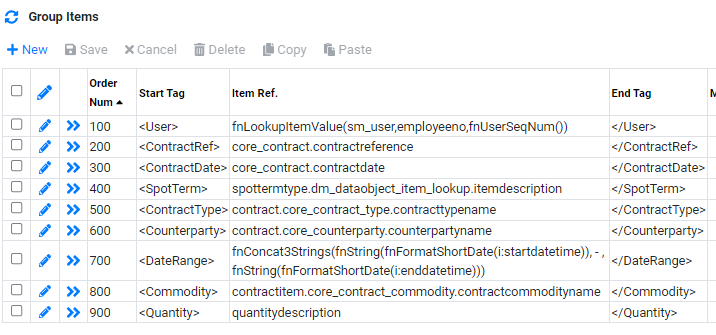
After each Schema group, we can create the individual JSON elements to be generated by the system.

Outgoing Interface Schema Group Items (Top)
To create a new Outgoing Interface, in Schema tab and Groups Items:
- Click on to create a new line.
- In Order Num, enter an order number for this line. In our example, we are using "100".
- In Start Tag, enter a start tag for this item. Typically, it is the element start attribute. For our example, we are using "SpotTerm" to indicate the value to be sent to destination that this value is spot or term.
- In Item Ref., select the item ref to set the data to be sent. In our example, we are using " spottermtype.dm_dataobject_item_lookup.itemdescription" to send out Spot or Term value.
- In End Tag, enter a end tag for this item. Typically, it is the element start attribute. For our example, we are using "/SpotTerm" to indicate the value to be sent to destination that this value is spot or term.
- In Method, Object, Match Item Refs, Match Item REf Values, Translate Object, From Item Id, To Item Id, Set to Null if value Equals, Response Success Value, Response Error Values, Response Message?, this are used by incoming interface message only.
- In Active?, tick this box to set this group items active.
- In Comments, enter any applicable comments for this group items.
- Then, click on to confirm the creation.
- To edit group items after creation, Click to edit.
- Below is an example of the group items that can be included in this outgoing interface message.
After we have setup the group items, we can test the JSON output message.
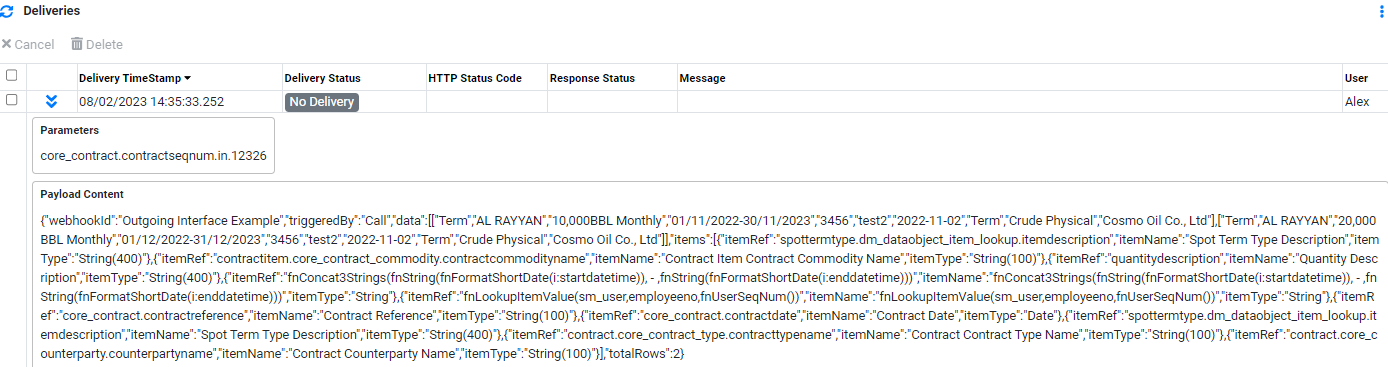
Outgoing Interface Test Output Message (Top)
To test the delivery output message:
- Select the Interface Message id that you wish to test the sending of interface message.
- Click on
 to trigger the interface.
 - After the interface is triggered successfully, we can check the results in "Deliveries" Tab like below:

*Be sure to have set a testing parameters before testing. In our example, we are testing one contract using "core_contract.contractseqnum.in.12326".*
The test results will contain the payload that will be sent as a message to the destination endpoint.
Creating Incoming Interfaces
CoreTRM allows receive interface message from external endpoint. We will use an example to show how to setup an incoming interface.
In our example, we will receive an XML message from an external endpoint. The XML will update the container details if a matching IMONO exist else it will create a new container.

To create a new Incoming Interface, in Incoming Interface view:
- Click on to create a new line.
- In Interface Id, enter a unique interface id. In our example, we are using "Incoming_Interface_Example".
- In Object Name, select an object from which the interface will update the data to. In our example, we are using "Container".
- In Request Type, select the applicable request type to be used for this interface. The Request Type available are HTTP and FTP. In our example, we are using "HTTP".
- In Request Format, select the applicable request format to be used for this interface. The Request Format available are JSON, XML and HTML. In our example, we are using "XML"
- In Request Address, enter endpoint address which will be provided to the external system. The endpoint will follow the address created here. You will need to start the address with the word "interface?interfaceid=interfaceidname". In our example, it will be "interface?interfaceid=Incoming_Interface_Example".
- In Active?, tick this box to make this interface active.
- In Payload Item Refs, select the applicable Payload Items. This is used for Email delivery method.
- In Credentials, select a credential to use if the destination address requires authentication. The authentication type use here is basic authentication.
- In IP Address List, select the list of IP addresses that are allowed to send to this endpoint.
- In Test Parameters, enter any criteria for testing the interface. This is only for outgoing interface.
- In Start Tag, enter any start tag to be generated as part of the message. In our example, we can include the xml message start encoding tag " ".
- In End Tag, enter any end tag to be generated as part of the message. This may be used as HTML end tag..
- In Webhook Num, display the unique webhook num generated for this interface after the interface details are created.
- Then, click on to confirm the creation.
- To edit incoming interface details after creation, Click to edit.
The full address is https://xxx.coretrm-app.com/interface?interfaceid=Incoming_Interface_Example
*Credentials are setup in System Admin-> Interface Builder-> Interface Credentials.*
*IP Addresses are setup in System Admin-> Interface Builder-> IP Addresses.*
After the interface data are setup above, next we will need setup the schema of the message.
Schema allow you to define the received format schema with specific tags provided by the destination endpoint. To create schema items, we will have to first create a scheme group. Schema Group allow you to group items in groups for easy organisation. In our example, we will create a few group to match the schema from the source endpoint.
Incoming Interface Schema (Top)
To create a new Incoming Interface, in Schema tab and Schema Groups:
- Click on to create a new line.
- In Order Num, enter an order number for this line.
- In Group Type, select an applicable group type. For outgoing interface, it will be "Receive" and "Response". "Received" is used to capture the details data and "Response" is used to send out an responds based on the action in the system.
- In Start Tag, enter any start tag for this group schema. In our example, we can specify the start tag used for the details data and return reponds.
- In End Tag, . enter any end tag for this group schema. In our example, we can specify the end tag used for the details data and return reponds..
- In Repeating Group?, tick this box if the data should be repeated if there are more than 1 row of data.
- In Active?, tick this box to set this schema group active.
- Then, click on to confirm the creation.
- To edit schema details after creation, Click to edit.
After each Schema group, we can create the individual XML elements that is part of the XML message. In our example, the XML element will only be in "Details" and "Return" group.

Incoming Interface Schema Group Items (Top)
To create a new Incoming Interface, in Schema tab and Groups Items:
We will use Order Num 2 as an exmaple.
- Click on to create a new line.
- In Order Num, enter an order number for this line. In our example, we are using "200".
- In Start Tag, enter a start tag for this item. Typically, it is the element start attribute. For our example, we are using "VSLNAME" to indicate the value to receiving from the source is Vessel Name.
- In Item Ref., select the item ref to set the data to be recevied. In our example, we are using " containername" to match back the Vessel Name.
- In End Tag, enter a end tag for this item. Typically, it is the element start attribute. For our example, we are using "/VSLNAME" to indicate the value to be sent from the source that is Vessel Name.
- In Date Format, set the date format of the receiving item value to YYYYMMDD.
- In Method, select the applicable method to use. In our example, "Update If Match else insert" will be used since we will insert the containername and details if there is no IMONO match.
- In Object, select the applicable object. Related to the method selected, which object will be used to find the match. In our example, we will use "Container".
- In Match Item Refs, select the applicable Item Refs. Related to the object selected, which item ref will be used to find the match. In our example, we will use "imonumber".
- In Match Item Ref Values, select the applicable Item Refs Values. Related to the Item Ref selected, which item ref value will be used to find the match. In our example, we will use "imonumber".
- In Translate Object, select the applicable object to use if translation is required. Translation refers to instead of using an item ref value, it can use another value to update. In our example in order num 500, for containertype, we will object "Container".
- In From Item Id, select the applicable from Item Id to use if translation is required. In our example in order num 500, for containertype, we will use "imonumber".
- In To Item Id, select the applicable to Item Id to use if translation is required. In our example in order num 500, for containertype, we will use "fnStaticText(V). With this, the system will actually insert V instead of imonumber value to containertype.
- In Active?, tick this box to set this group items active.
- In Comments, enter any applicable comments for this group items.
- Then, click on to confirm the creation.
- To edit group items after creation, Click to edit.
"Update if Match" is used when if there is a matching item, the system will update else no action.
"Update" is used when if there is a matching item.