View Builder
The CoreTRM allow each tenant to create a view or modify an existing views in the system.
To access View Builder go to System Admin and then to the View Builder tab.
Understanding View Structure
Adding New DataObject Item in an existing view
Creating a new panel
Item Overrides
Panel Filters
Custom Panel
CSS Class Size
Example of using Row Item Refs
Example of using Group Item Refs
Example of using Parent Panel
Example of using Pivot Panel
Understanding View Structure
CoreTRM is a web based application which is made up of views. Each views consist of different panels which build up the entire view. There are many types of panels which can be used. They are: Tab Container Pills, Container, Tab Container, Table, Pivot and Charts. There are also special panel build for specific functions. Typically, one or more panels are used to form a view.

Typically, a combination of different panel types are used to build a view.
A view typically starts with a "Tab Container Pills" which allow the view to display in tab format.
Then, each tab can be build using either a Tab Container or a Container. A Tab Container will be used if more tabs are needed within a Tab so that group of related data appear in different tabs.
Next, inside each tab, panel type such as "Table", "Pivot" or "Charts" can be used to set the way how the data will be displayed.
Finally, within the panel type, a DataObject will be attached to it and relevant DataObject Item can be selected in order to display the data.
Adding DataObject Item in an existing view (Top)
You can add DataObject Item in any existing views. By adding the DataObject Item into a view from the view builder will set the DataObject Item as part of the default view. DataObject Item can be added as a Column Item Ref or as a Row Item Ref in the view.
For example, adding "Comments" DataObject Item into the Contracts table in the Physical View.
To a DataObject Item in an existing view:
1. Navigate to System Admin then View Builder.
2. From the Views list, search for "Physical" view and click on the name to go to View Details.
3. From the Panel Builder, search for Contracts Table.
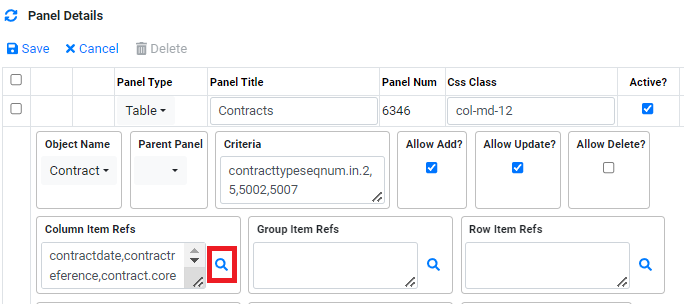
4a. If DataObject Item is added as Column Item Ref, from the Panel Details, go to Column Item Refs and click on  .
.
4b. If DataObject Item is added as Row Item Ref, from the Panel Details, go to Row Item Refs and click on .

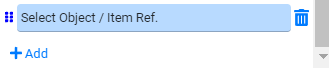
5. From the pop up Select Item Refs, click on  . to start selecting a new Item Ref to add to the table.
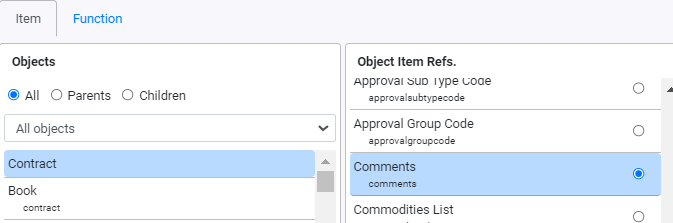
6. Next, from the pop up, in Objects select Contracts and in Object Item Refs select Comments.
7. Then, click on  to confirm the selection.
8. Then, click on  to confirm the changes again. *This step needs to be done to see the changes on the display.

9a. If DataObject Item is added as Column Item Ref, now if you navigate to the Contract screen in Physical View, "Comments is added" as a column in the view.

9b. If DataObject Item is added as Row Item Ref, now if you navigate to the Contract screen in Physical View, "Comments is added" as a row in the view.

Creating a new panel (Top)
For example, creating a new panel name "Vessel" in Reference Data view. In this panel, we will allow the user to view, insert or delete a Vessel data. In CoreTRM, Vessel is a type of Container, So we will be using Container DataObject.
- Navigate to System Admin then View Builder.
- From the Views list, search for "Reference Data" view and click on the name to go to View Details.
- From the Panel Builder, click on
 and select the panel type to use. Typically, as we are adding a new panel in a Tab Container -Pills, we can either use a "Tab Container" or "Container". Since we are only displaying one type of data, we can choose "Container".
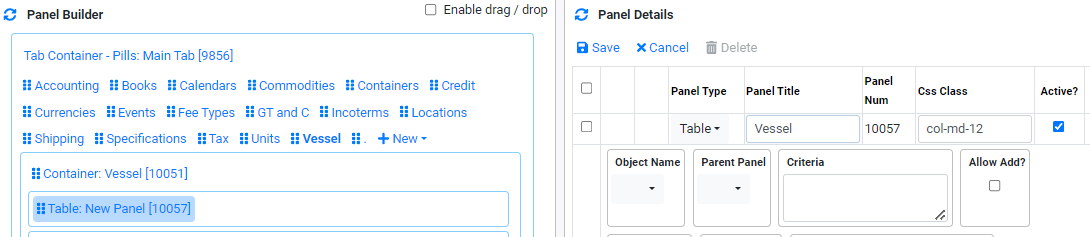
 - Once you have selected the panel type, the system will create a new panel as shown below.
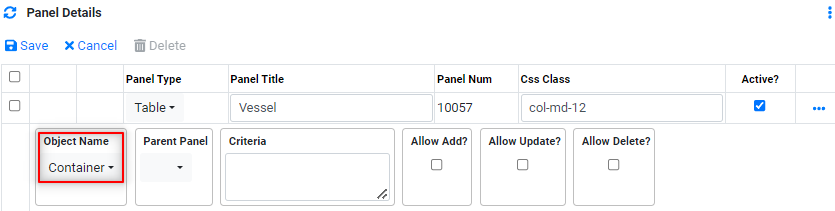
- Next, click on the "Container: New Panel" to select the panel. Go to the Panel Details and enter a name in the Panel Title Box. In our example, the name can be "Vessel".
- Next, click on in the Panel Details to confirm the name change.
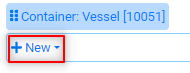
- Next, under the new "Vessel" Container, click on to add a new panel. We will use "Table" panel here.
- Next, click on the "Vessel" table to select the panel. Go to the Panel Details and enter a name in the Panel Title Box. In our example, the name can be "Vessel" again.
- Next, click on in the Panel Details to confirm the name change.
- Next, we can set the Object Name for this table. The system will use this Object Name to populate the data. Since vessels are in Container DataObject, we will choose Container for Object Name.
- Next, in Parent Panel, we are not using in this example. Typically, Parent Panel will be used when we have 1 table linking to another table.
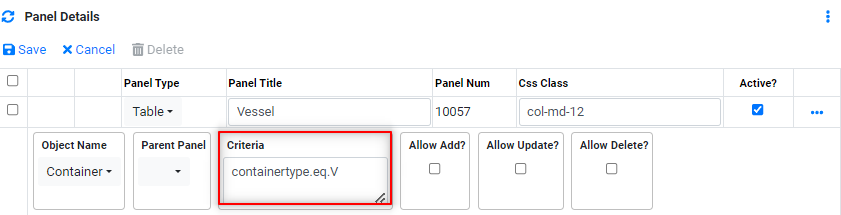
- Next, in criteria, we can specify a criteria (or filter criteria) that can filter out unwanted data to be displayed. In our example, we can only show container type that are vessels as a filter criteria since Container includes Barge, Storage, Pipeline, etc.
- Formula and function can be used in criteria. For our example, the criteria will be containertype equal V(Vessel).
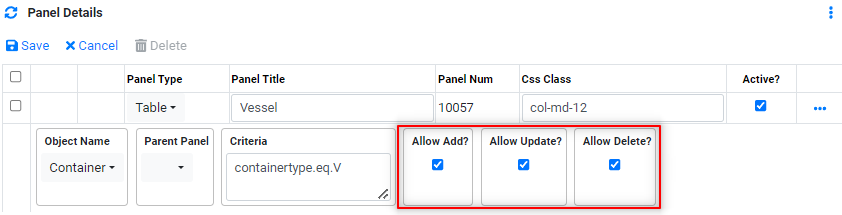
- Next, we can set the permission for the table. We will tick "Allow Add", "Allow Update" and "Allow Delete" since we will allow user to create, update and delete data in this table.
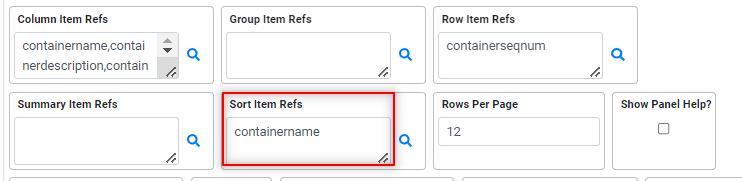
- Next, we will decide the DataObject Item that will be displayed in the table panel. We will use the Column Item Ref to do this.
- Next, Group Item Refs are used to display the data in grouping in the table. In our example, this is not used.
- Next, Row Item Refs, it is used to display selected DataObject Item in a row format. This is typically for Object Item that are not mandatory to fill up. In our example, this is not used.
- Next, Summary Item Refs are used to display total of a number column at the end of the table. In our example, this is not used.
- Next, Sort Item Refs are used to indicate the sort order of the data display. In our example, we can use containername as sort order.
- Next, Row per page allow you to set the default number of row of data to be displayed in the table per page. In our example, we can leave it to 12.
- Next, Show Panel Help?, check the box if Panel Help is to be displayed by default. This is related to Panel Help Html. In our example, we can tick the box. We will add the text in the Panel Help Html.
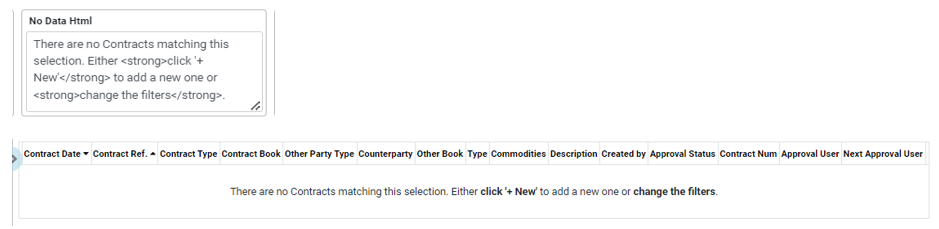
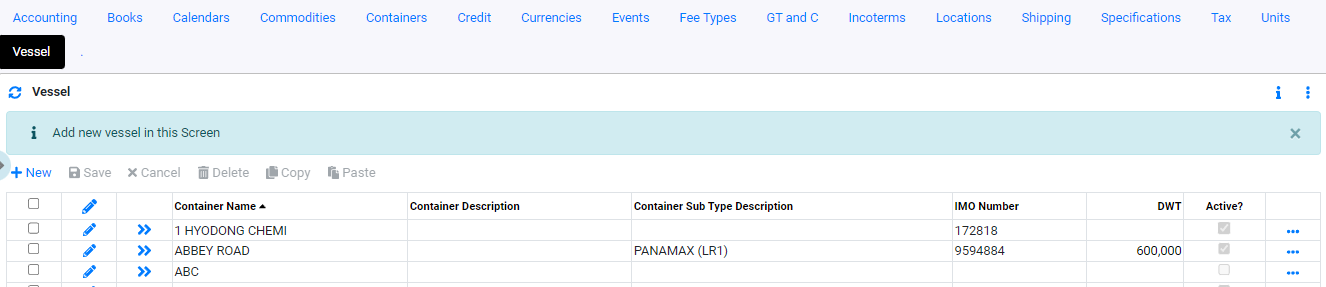
- Next, Panel Help HTML, enter the panel help HTML that will be display at the top of the panel. For Example, "Add new vessel in this Screen". This field is optional.
- Next, in show filter will set if the filter will appear as default when the table panel appear. In our example, lets tick the box.
- Next, No data HTML allow you to set text that will appear when there are no data to be displayed in the table. In our example, we will leave it blank.
- Next, Disable User Column Item Ref allow you to provide user with the ability to click on
 to add, delete or move grid columns in the table. In our example, we will leave it blank.
 - Next, Disable User Row Item Ref allow you to provide user with the ability to click on
 to add, delete or move grid columns in the table. In our example, we will leave it blank.
 - Next, Include Filters from Other Panel allow you to include filters from other Panel. In our example, we will leave it blank.
- Then, click on to confirm the changes. *This step needs to be done to see the changes on the display.
To create a new panel:


*Css Class is used to determine the length of the panel on the view. More information about Css Class can be found here*.

*An example of using Parent Panel can be found here*.
containertype.eq.V
This permission is the overall panel permission which controls the button avaiable on the panel. Specfic fields are allowed to be updated can be control in Item Overrides below.
Column Item Refs will display the selected Object Item as a column in the table. It is mainly used for Items Ref that are important.
*Detail steps on how to select Item Refs. can be found here.*
*Example of using Group Item Refs can be found here.*
*Example of using Row Item Refs can be found here.*
*Example of using Summary Item Refs can be found here.*


An example of Panel Help HTML:


An example of No data HTML displayed in contract table in Physical view:
More information on Grid Columns can be found here

More information on Row Columns can be found here

Example of Include Filters from Other Panel can be found here
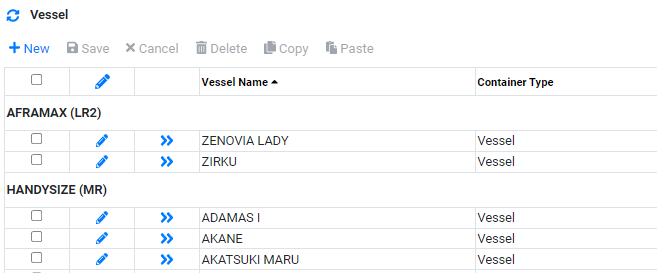
In our example, If you navigate to Reference Data -> Vessels, a Vessel Table will be displayed like below.
Once, all the panel details are setup, we can add further settings to the panel using "Item Overrides", "Filters" and "Customs".
This settings can be found lower section of the panel details like below:

Item Overrides (Top)
- Navigate to Item Overrides tab.
- Click on
 to create a new line.
 - In Item Reference, select the Item Reference that you intend to give the settings. The Item Reference name needs to be the same as what you have used either in Column "Item Refs" or "Row Item Refs".
- In Display Name, allow you to set the display name of the Item Refs. If no Display is set, the system will use DataObject Item Name set in Data Model as default name.
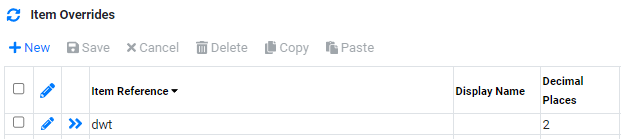
- In Decimal Places, allow you to set the number of decimal places to be displayed for a decimal data type Item Ref. If no Decimal Places are set, the system will use no decimal as default.
- In Date Format, allow you to set the date format for Item Ref with datetime. If no date format is set for datetime ItemRef, the system will use default MM/dd/yyyy hh:mm:ss depending on your formatting culture.
- In Read Only?, allow you to set an Item Ref to be Read Only. By default all Item Ref will be editable.
- In Default Value, allow you to set a default value for an Item Ref when a new line is create in the table. In our example, we can set containertype to default value to V (for Vessel).
- In Lookup Object Name, Lookup Display Item Refs, Lookup Value Item Refs, Lookup Criteria and Lookup Bind Value Item Refs, allows you to set lookup item from another Dataobject and display as a dropdown list value in the table.
- In Lookup is Optional?, allow you to set if the Lookup used will be optional. Optional refers to blank value is allowed for the dropdownlist selection. This is used only when step 9 is setup.
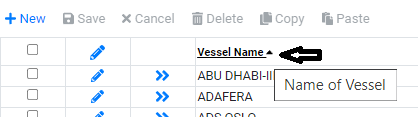
- In Tooltip Name, allow you to set a tooltip name to the header of the column when mouse over the column header. For example, set Tooltip name as "Name of Vessel".
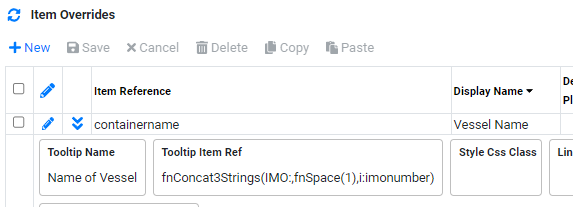
- In Tooltip Item Ref, allow you to set a tooltip value based on another Item Ref when mouse over the column value. For example, set imonumber as Toooltip Item Ref for containername with IMO as at Text infront.
fnConcat3Strings(IMO:,fnSpace(1),i:imonumber) - In Style Css Class, allow you to set css style to the background or value of the Item Ref. The css style can also be based on condition.
- In Link Address, allow you to set a hyperlink on the Item Ref value which can redirect user to another page.
- In Substitute Item Ref, allow you to substitute the current Item Ref value with another Item Ref Value.
- In Lookup Sort Item Refs, allow you to sort the Lookup Item Ref value in the dropdownlist. This is used when step 9 is used.
- In Group Total Calc Text, Group Total Calc, Grand Total Calc Text, Grand Total Calc, allows you to display a group and grand total on Item Ref which as a value. This is mainly use for panel that are built for reporting purposes.
- In Column Width, allow you to set a fix width to the column. If no fix column width is set, the system will adjust the width of the column dynamically according to screen size.
- In Item Helper, it is used internally by the system. This will not be used in most cases.
- In Item Helper Param Item Refs, it is used internally by the system. This will not be used in most cases.
- Then, click on to confirm the creation.
- To edit item overrides details after creation, Click
 to edit.
Item Overrides can be used to set functions such as Display Name, Decimal Places, Date Format, Read Only, Default Value and more on each Item Ref in the table.
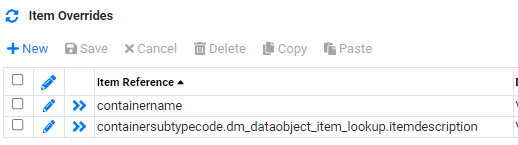
In our example, to start setting Item Overrides:
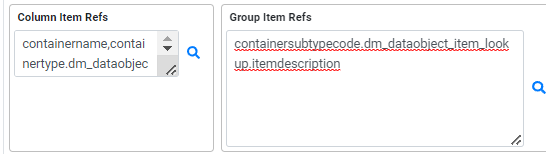
For example, container name or containersubtypecode.dm_dataobject_item_lookup.itemdescription for containersubtype.


For example, for Item Ref that are linked to "DataObject Item Lookup" like containertype, lookup item needs to be setup like below:
For Lookup Object Name, it will be the Object Name where you are retrieving the value from. In this example, it is "DataObject Item Lookup".
For Lookup Display Item Refs, it will be the Item Ref value to be displayed in the dropdown list. In this example, it is "itemdescription".
For Lookup Value Item Refs, it will be the Item Ref use in the Lookup Object Name to match back to the Item Ref in the DataObject of the table panel. In this example, it is "itemvalue".
For Lookup Criteria, it will be criteria used to filter the value in the dropdownlist. In this example, it is "dataobjectitemseqnum.eq.27513". 27513 is the Item Num of containertype in container Dataobject.
For Lookup Bind Value Item Refs, it will be the Item Ref use in the DataObject in the table panel to match back with the the Item Ref use in the Lookup Object Name. In this example, it is "containertype".

Another example will be display a dropdown list of counterparty name in contract table panel in Phsyical view:
For Lookup Object Name, it will be the Object Name where you are retrieving the value from. In this example, it is "Counterparty".
For Lookup Display Item Refs, it will be the Item Ref value to be displayed in the dropdown list. In this example, it is "counterpartyname".
For Lookup Value Item Refs, it will be the Item Ref use in the Lookup Object Name to match back to the Item Ref in the DataObject of the table panel. In this example, it is "counterpartyseqnum".
For Lookup Criteria, it will be criteria used to filter the value in the dropdownlist. In this example, it is "core_company.companystatuscode.eq.A". This is retrieving only counterparty who is active.
For Lookup Bind Value Item Refs, it will be the Item Ref use in the DataObject in the table panel to match back with the the Item Ref use in the Lookup Object Name. In this example, it is "counterpartyseqnum".

When you roll over a containername, a tooltip showing the IMO number appears.

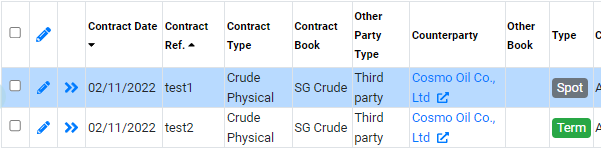
For example, in contract table of Physical view, Spot or Term showning different background color based on spottermtype is either S or T.
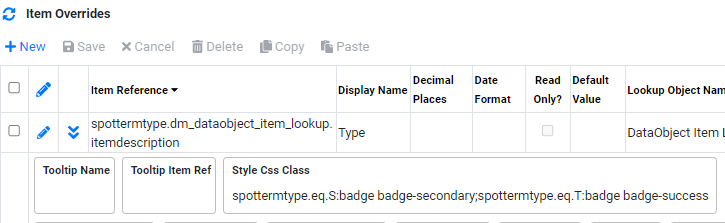
Below is how Spot and Term appear in contract table.
For example, in contract table of Physical view, counterparty name has a hyperlink which links to Credit Exposure in Credit.
The link address starts with the url of the Credit Exposure and then adding a filter to set companyseqnum is equal from counterparty DataObject and Contract DataObject.
credit-exposure#p_5513_filter=contract.core_counterparty.companyseqnum.eq.{contract.core_counterparty.companyseqnum}

The link address look like below:

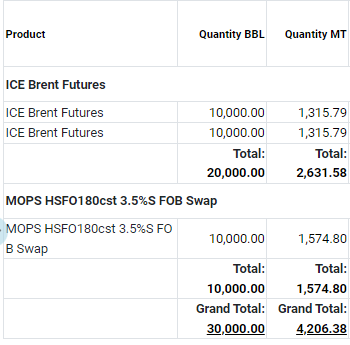
For Example, we have a report using DataObject "Valuation" that shows commodityname, quantity in MT and quantity in BBL.
We can use Group Total Text as: "Total", Group Total Calc as {bblvaluetodate}/{mtvaluetodate} in Quantity BBL/Quantity MT Item Ref to show Total Quantity by Commodity Name.
We can also use Grand Total Calc Text as: "Grand Total" and Grand Total Calc as {bblvaluetodate}/{mtvaluetodate} in Quantity BBL/Quantity MT Item Ref to show Grand Total Quantity.We will also group the table by commodityname so that grouping will appear.
In the item overrides, the setting will be like below

In view, the table will display Total Quantity in BBL/MT by Commodity/Product. There will also be group total and grand total.
Panel Filters (Top)
In addition, we can also setup filters in the panel. To setup filter in the panel:
In our example, to start setting up Panel Filters:
- Navigate to Filters tab.
- Click on to create a new line.
- In Order Num, enter the order num in which the filter will appear. Lowest number appear first.
- In Setting is Optional?, tick the box if the setting is optional.
- In Not Set Display Text, enter a text when no selection is made.
- In Filter Type, select the type of filter type to use. The filter type avaialble are Buttons, Dropdown, Multi Select Dropdown, Search Box, Specific Date, Specific Values and Two Specific Dates. The setup on step 7 depends on Filter Type.
- In Object Name, Lookup Display Item Refs, Lookup Value Item Refs, Lookup Sort Item Refs, Lookup Criteria, Panel Criteria, this is used to display dropdown list based on DataObject.
- In Default Values, set a default value if applicable. When a default value is set, the value will appear whenever the user view the panel.
- In Save User Selection?, tick the box if user selection is to be saved. When this is ticked, the last selection or value entered in the filter will be remembered. The next time the user access the view, it will be automatically shown. User Save selection is kept in "Users Filters" tab.
- Then, click on to confirm the creation.
- To edit filter details after creation, Click to edit.
Examples of different type of filters are:
{0} refers to the input value from the filter box. If there are 2 boxes in the filter box example Two Specific Date, the first box input value is {0} and second box input value is {1}.
a. Dropdown: this is used when you intend to provide a dropdown list of value to the user when performing a filter search.
For example, creating a dropdown list filter for Vessel SubType. Since the dropdown values is from DataObject Item Lookup table, Object Name, Lookup Display Item Refs, Lookup Value Item Refs, Lookup Sort Item Refs, Lookup Criteria and Panel Criteria will be used. The condition use will be equal (.eq.).

b. Multi Select Dropdown: this is used when you intend to provide a multi select dropdown list of value to the user when performing a filter search.
For example, creating a multi dropdown list filter for Vessel SubType. Since the dropdown values is from DataObject Item Lookup table, Object Name, Lookup Display Item Refs, Lookup Value Item Refs, Lookup Sort Item Refs, Lookup Criteria and Panel Criteria will be used. The condition use will be in (.in.).

c. Search Box: this is used when you intend to provide a search box to the user when performing a filter search. Search box allow filtering of more than 1 value using comma.
For example, creating a search box for containername. For search box, only Panel Criteria is required. The condition use will be contain (.cn.).

d. Specific Date: this is used when you intend to provide a specific one date search box to the user when performing a filter search.
For example, creating a specific date filter for creationdate. For specific date, only Panel Criteria is required. The condition use will be equal (.eq.)

e. Specific Values: this is used when you intend to provide a search box to the user when performing a filter search. Specific value search box can only search by exact words.
For example, creating a specific value filter for imonumber. For specific value, only Panel Criteria is required. The condition use will be equal (.eq.)

f. Two Specific Dates: this is used when you intend to provide a date range box to the user when performing a filter search.
For example, creating a two specific value filter for creationdate. For two specific value, only Panel Criteria is required. The condition use will be greater than equal (.ge.) and less than equal (.le.).

g. Buttons: this is used when you intend to provide buttons as a filter to the user when performing a filter search.
For example, creating a button filter for vesselsubtype. For button, it is typically used for displaying specific set of value filter.

Buttons filter appear like below:

Custom Panel (Top)
Custom Tab allows you to add custom application into the view so that based on selection by the user, the custom application will be triggered. This is typically use when you see the button appearing on top of the table
For example, approval or document printing. An example of using Custom Panel for setting up Document Printing is here.
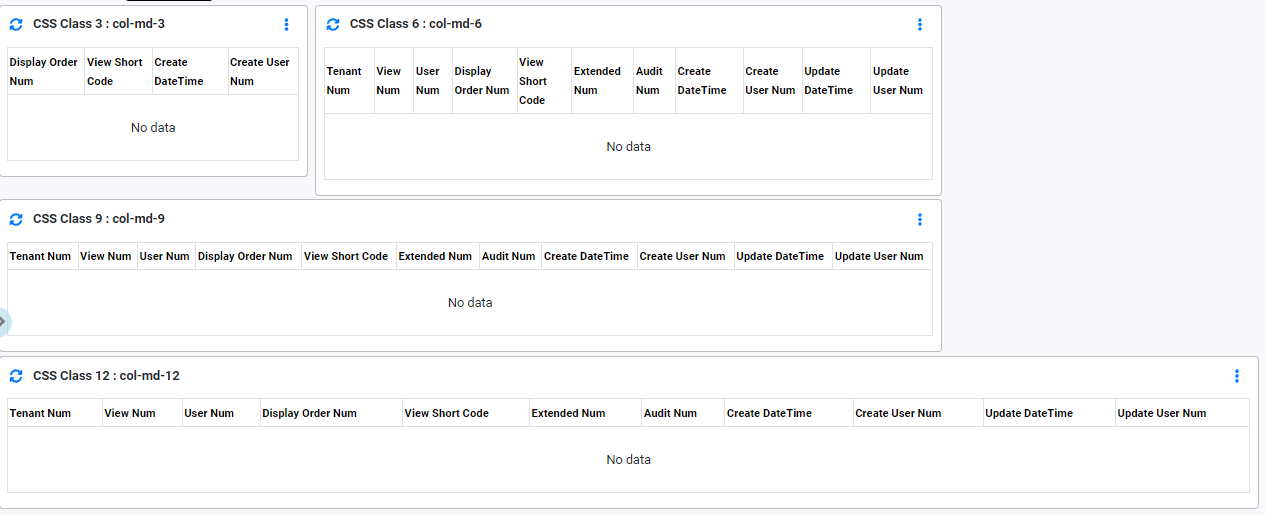
CSS Class Size (Top)
The size of the panel that display on the view are control using the CSS class in the Panel Details. The maximum width of the panel in the view is 12. By indicating different number in the CSS Class will determinet the size of the panel. Typically, 4 sizes are used: col-md-3, col-md-6, col-md-9 and col-md-12.
It is also important to note that CoreTRM dynamically adapt to different screen size using CSS class.
Below are example of how the panel looks like with different sizes.
Example of using Group Item Refs (Top)
An Example of using Group Item Refs, is using containersubtypecode as a grouping in our vessel table.
Including a Group Item Refs of containersubtypecode in the panel details of the Vessel table.
The table now will show a grouping of vessel type like below:
Column Item Refs (Top)
To start selecting Item Refs to be included in the table:
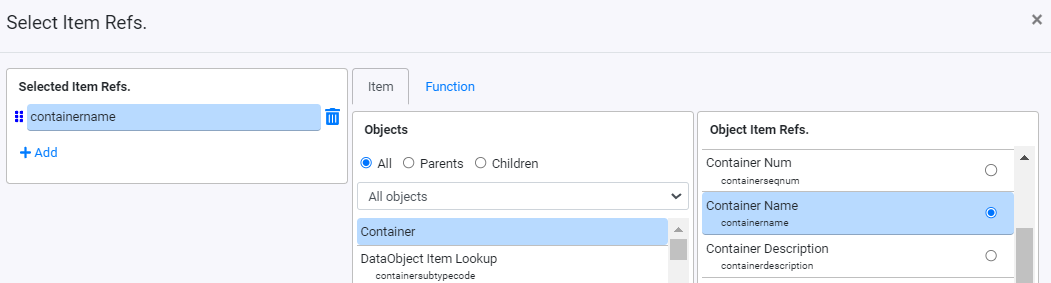
- From the Column Item Refs, click on to open the Item Refs browser pop up.
- From the "Object" section, select the object from which the Item Ref you wish to be included in the table panel. After selecting the "Object", from the "Object Item Refs" section, select the Item Refs that you wish to use.
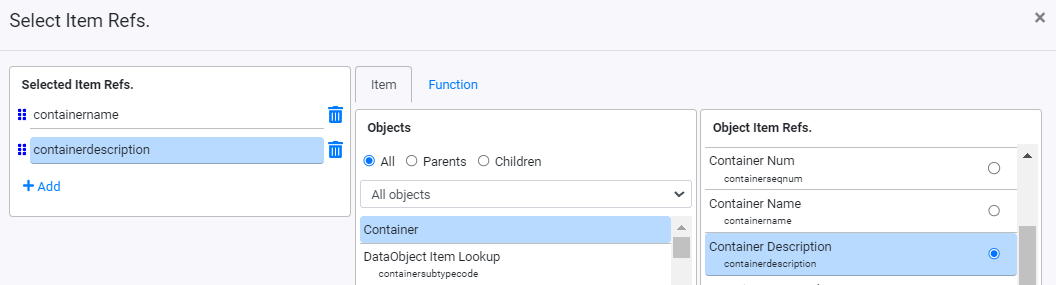
- To add more Item Refs, click on to add the next item ref.
- You can add more Item Ref by repeating Step 3. For Example, below are a few more Item Refs related to Vessels.
- Once all the Item Refs are selected, click on to confirm the selection.
In our example, we will use Container Object and select containername as the first Item Ref.
For Example, below is selecting containerdescription item refs from Container object.
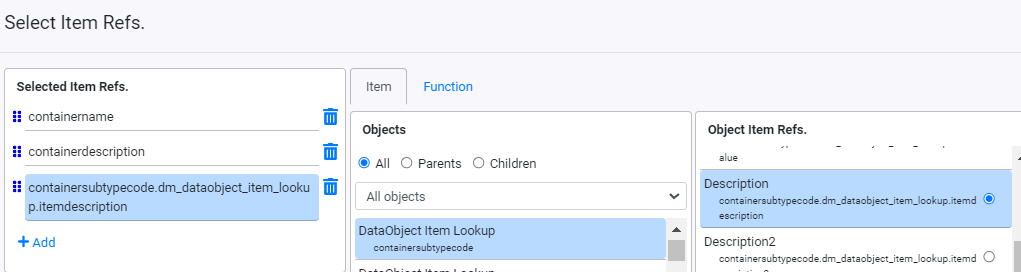
*It is also possible to add DataObject Item from another object as long as the destination object has a relationship with the based object (here is Container).
For Example, we can add containersubtype as an Item Ref. However, containersubtype is a code which is not useful. So we will want to use the description of the containersubtype. Since containersubtype is linked to DataObject Item Lookup which has the description. We will select Object "DataObject Item Lookup" with word containersubtypecode and Object Item Ref "Description".

More information about Item Refs can be found in Understanding Item References.
Example of using Row Item Refs (Top)
To start selecting Item Refs for Row Item Refs:
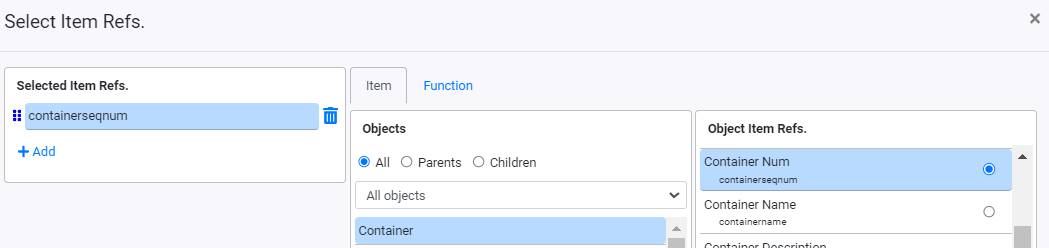
- From the Row Item Refs, click on to open the Item Refs browser pop up.
- From the "Object" section, select the object from which the Item Ref you wish to be included in the table panel. After selecting the "Object", from the "Object Item Refs" section, select the Item Refs that you wish to use.
- To add more Item Refs, click on to add the next item ref.
- Once all the Item Refs are selected, click on to confirm the selection.
- Below is how Row Item Ref appear in the table.
In our example, we will use Container Object and select containerseqnum for example.
*It is also possible to add DataObject Item from another object as long as the destination object has a relationship with the based object (here is Container).

Example of using Parent Panel (Top)
Parent Panel are typically use when you are linking one panel to another panel using a unique key. Typically, parent to child panel has a one is to many relationship. For example, one contract can have many contract item and contract item can be linked to contract using contractseqnum. When a panel has a Parent Panel, it will only allow the panel to enter data after Parent Panel data is entered. For example, only a contract is created before contract item can be created.
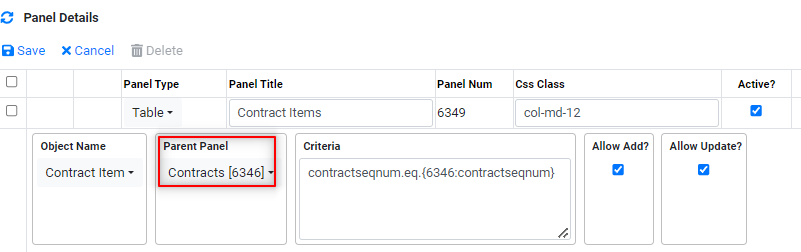
For example, lets take a look at the contract item panel in the Physical view which has a parent panel of contract.
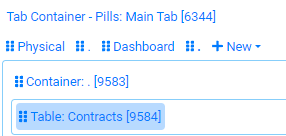
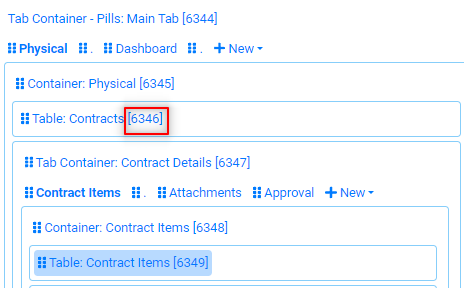
- In the contract item panel, indicate that the parent panel is contract. In addition to selecting contract panel from the dropdown list, it is also required to choose the correct contract panel. Each panel created in the system has a panel number. In the example here, the contract panel we wish to use is having panel number 6346. Typically, we will use the contract panel in the same screen as the contract item. So that when a contract is selected in the Phsyical view, the contract item information related to this contract will be displayed.
- This is where panel number appears. Contract panel number 6346.
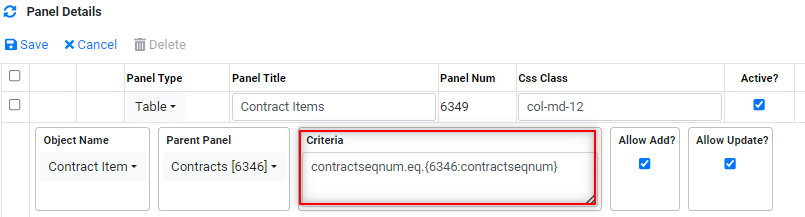
- After the contract is selected as the parent panel, next we will need to link the contract panel with the contract item panel. To link the 2 panels, we will need to use a key that exist in both contract and contractitem and the key is contractseqnum.
- The link will be setup in the contractitem criteria like below:
-
The condition to use will be contractseqnum in contractitem equal to contractseqnum in contract. To indicate contractseqnum of contract, panel number can be used like below.
contractseqnum.eq.{6346:contractseqnum} - Once these 2 settings are setup, now the contract item panel will be linked to the contract pane.
Example of using Summary Item Refs (Top)
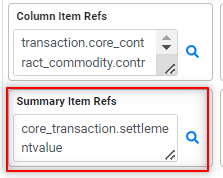
If summary item ref is used, the total value of the column will be displayed at the bottom of the column.
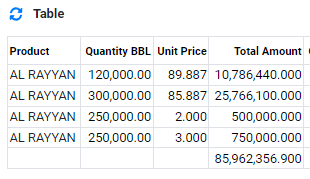
For example, if we have a report based on valuation. We would like to provide a total on the total amount(settlementvalue) at the bottom of the Total Amount column. We can indicate like below:
The Total will appear like below:
Example of using Pivot Panel (Top)
Pivot panel are typically used for reporting purposes. It works like excel pivot to group related data in group and display value related to that group.
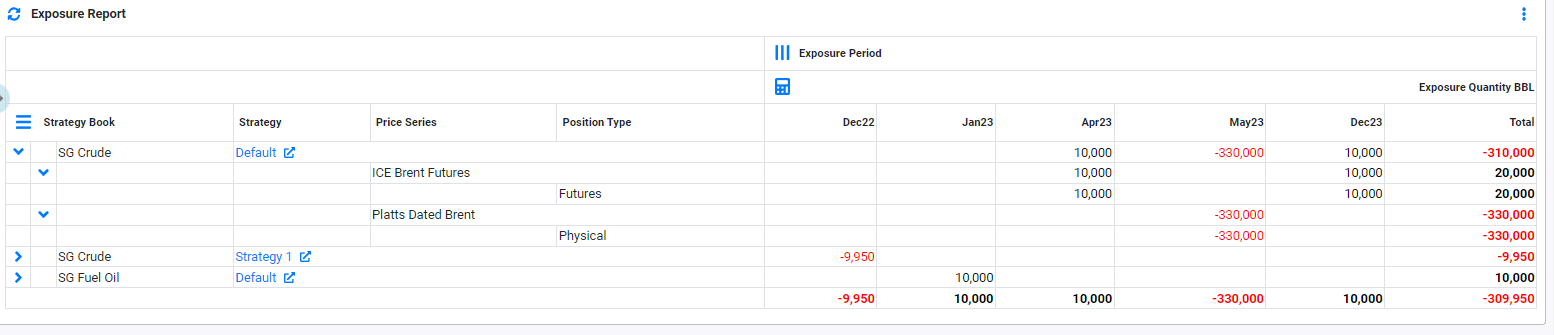
For example, we will build a Exposure Report with the following setup:
Panel Type: Pivot Table, Object Name: Valuation Item. Exposure value are available natively in valuation item table so it is easier.
Column: Strategy Book, Strategy, Price Series, Position Type.
Value: Exposure Quantity by Period (Example: DEC22, JAN23, etc)
Group By: Strategy Book and Strategy Name (Level 1) and Price Series (Level 2)
Below are the Panel Details Setup:
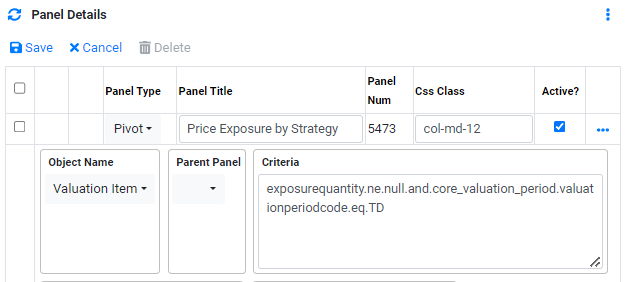
- Panel Type: Pivot, Panel Title: Exposure Report, Object Name: Valuation Item and Criteria:
exposurequantity.ne.null.and.core_valuation_period.valuationperiodcode.eq.TD. - Column Item Ref will be periodid. Column Item Ref will be column on the right side of the pivot table.
- Row Item Ref will be Position Type Name and Value Item Refs will be
fnSum(i:exposurequantitybbl). - Pivot Table type is Column Row and Grand. When this is selected, column and row and Grand total will be displayed. There are other type of pivot table type such as "Column Only", "Column and Row", "None" and "Row Only".
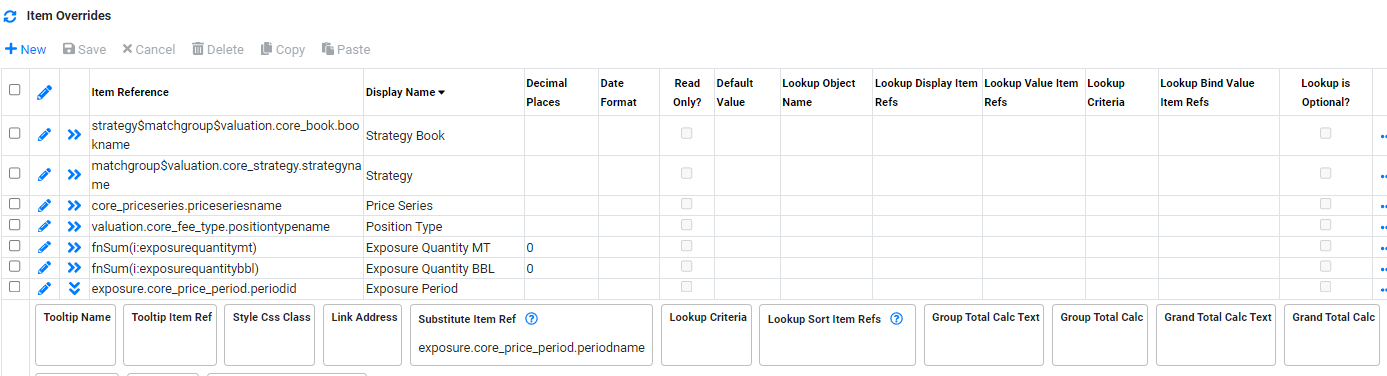
- Finally, we can use Item Overrides to Rename the column name.
- Finally, Pivot table will look like below:
Criteria will exlcude rows of data with exposurequantity is null and include only row of data with valuation period code equal TD (Today).
Valuation item contains rows of data saved in the system for every valuation run. Using valuation period code equal TD will only select the latest valuation date data.
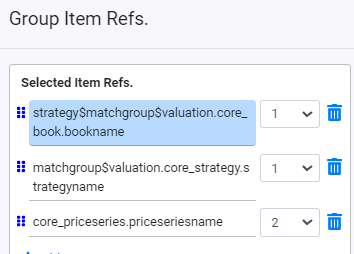
Group Item Ref will be book name, Strategy Name and Price Series. Group Item Ref will be the group for each row. We will first group by Book and Strategy name (Level 1 Grouping) and then price series (Level 2 Grouping).

To Set level one and level two grouping click on in Group Item Refs and select the level.
Row Item Ref is the remaining columns on the left of the pivot which is not part of the grouping. You can include more items.
Value Item Ref will be the value used for the grouping. In this example is exposurequantitybbl. Function fnSum is used is because in valuation items, exposurequantity are breakdown by day. We will need the sum of exposurequantity in a period (in a month) so we use fnSum.


For periodid, we can subsitute the value with price_period.periodname. This will change the value to periodname which is in the form of MMMYY.