To add a new booking entities go to Reference Data and then to the Booking Entities tab.
In accounting, you can setup new booking entities and its related properties. In addition, settlement basis which is used to calculate due date and settlement period can be also setup here.
Setting up Booking Entities
Setting up Settlement Basis
Setting up Booking Period
Setting up Reference Mask
Setting up Booking Entities

To add a booking entities:
- Click on
 to create a new line.
 - In Booking Entity Name, enter the name of the booking entity.
- In Booking Entity Short Name, enter the name of the booking entity short name.
- In Company Registration id, enter the company registration id. Typically, this can be used to be printed on the invoice.
- In Tax Registration id, enter the tax registration id. Typically, this can be used to be printed on the invoice.
- In Booking Entity Currency Code, this defaulted to USD.
- In Booking Entity Tax Code, select the to tax currency of the company if it is different from USD.
- Click
 to confirm creation.
 - To edit booking entity details after creation, Click
 to edit.

To add a booking entities, from the address view:
- Click on to create a new line.
- In Address name, enter the address name of the booking entity. Each address name has a set of address.
- In Active?, check the box to set the address name active.
- In Default?,check the box to set the address name as default. This address will use in settlement.
- Click to confirm creation.
- To edit address details after creation, Click to edit.
*More than one address name (Set of addresses) can be created.*

To add a booking entities, from the address line view:
- Click on to create a new line.
- In Line Order Num, enter the line order number. This will determine which address line to be display first and in this order.
- In Address Line, enter the address.
- Click to confirm creation.
- To edit address line details after creation, Click to edit.
Setting up Reference Mask
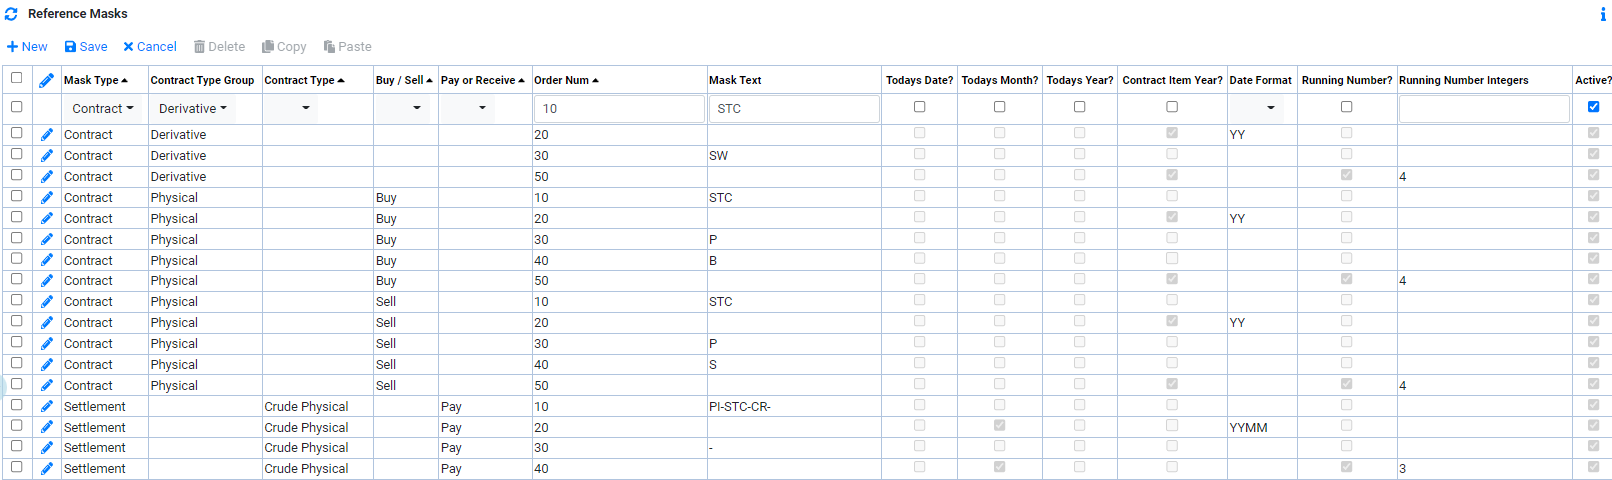
Reference Mask is used to generate automatic reference number used in the system. There are contract ref. and settlement ref. which can be setup to use reference mask. Automatic reference number can be setup based on Contract Type Group, Contract Type, Buy/Sell and Pay or Receive criteria.
To setup reference mask:
- Click on to create a new line.
- In Mask Type, select the type to use reference mask. Example: Contract or Settlement.
- In Contract Type Group, select the type group. This can be either Derivatives or Physical.
- In Contract Type, select the contract type if applicable. If this is blank, it applies to all contract type.
- In Buy/Sell, select buy or sell if applicable. If this is blank, it applies to all deal type.
- In Pay or Receive, select pay or receive if applicable. This is used for settlement mask type. If this is blank, it applies to all settlement type.
- In Order Num, enter the order number in which the reference should start with.
- In Mask Text, enter a text if a static text will be used as part of the reference generation.
- In Todays Date?, check the box if today Date will be used as part of the reference generation.
- In Todays Month?, check the box if today Month will be used as part of the reference generation.
- In Todays Year?, check the box if today Date will be used as part of the reference generation.
- In Contract Item Year?, check the box if the year of contract item Date will be used as part of the reference generation.
- In Date Format, enter the date format to use if Todays Date, Todays Month, Todays Year or Contract Item Year is used. For Example, YY or MM.
- In Running Number?, check the box if running number will be used as part of the reference generation.
- In Running Number Integers, enter the number of integer to use if Running Number is checked. For example, if 4 is used. The running number will start with 0001.
- In Active?, check the box to set the line active..
- Click to confirm creation.
- To edit reference mask details after creation, Click to edit.
For example, the reference can be set with 5 component. Start with a static tex "STC", then follow by year of contract item date, then static text "P", then static text "B" for Buy and "S" for Sell and finally a 4 digit running number. The results will be for all Physical Buy deal reference will be STC22PB0001 and for all Physical Sell deal to reference will be STC22PS0001. The example below show this setup.

Setting up Settlement Basis

To add a new settelment basis:
- Click on to create a new line.
- In Settlement Basis Name, enter the name of the settlement basis.
- In Event, select the event for which this settlement bais calculation should be based on.
- In Event Offset Num, enter the number of days to offset from the event.
- In Include Event Indicator, tick the box if offset should start counting from event date itself or one day after the event date.
- In Offset Num Type, select the offset type. It can be either using Business Day (Mon to Fri Excluding holiday) only or Calendar Days (Every day of the week count).
- In Weekend Rule, select the Weekend Rule to use.
- In Holiday Rule, select the Holiday Rule to use.
- In Calendar, select the calendar to used for Holiday checking.
- In Event2, select the 2nd event for which this settlement bais calculation should be based on.
- In Event Offset Num2, enter the number of days to offset from the 2nd event.
- In Include Event Indicator2, tick the box if offset should start counting from event date itself or one day after the 2nd event date.
- In Offset Num Type2, select the offset type for 2nd event. It can be either using Business Day (Mon to Fri Excluding holiday) only or Calendar Days (Every day of the week count).
- In Weekend Rule2, select the Weekend Rule to use for 2nd event.
- In Holiday Rule, select the Holiday Rule to use for 2nd event.
- In Earlier or Later of?, select the rule to use for the calculated due date based on event and event2.
- In Transaction Basis?, tick the box if this settlement basis can be used for transaction due date calculation.
- In Fee Basis?, tick the box if this settlement basis can be used for fee due date calculation..
- In Settlement Handling?, select settlement Handling type. Party-to-Party for buy/sell counterparty type. Margin for derivatives trading.
- Click to confirm creation.
- To edit settelment basis details after creation, Click to edit.
*Events setup can be found in Reference Date -> Events*
For Example, 10 days after Invoice Received, Event Offset Num = 10.
*Prev : If Calculated Due Date falls on a Weekend, Friday will be used.*
*Next : If Calculated Due Date falls on a Weekend, Next Monday will be used.*
*Split : If Calculated Due Date falls on a Saturday, Friday will be used. If Calculated Due Date falls on a Sunday, Next Monday will be used.*
*Prev : If Calculated Due Date falls on a Holiday, Friday will be used.*
*Next : If Calculated Due Date falls on a Holiday, Next Monday will be used.*
*Monday Next Otherwise: If Calculated Due Date falls on a Holiday which is on Friday, Next Monday will be used. Otherwise, Thursday will be used.*
*Holiday setup can be found in Reference Date -> Calendar*
*If the settlment basis required to do a comparision between two event dates, continue setup from step 10 to step 16. Alternatively, go directly to step 17.*
*Events setup can be found in Reference Date -> Events*
For Example, 10 days after Invoice Received, Event Offset Num = 10.
*Prev : If Calculated Due Date falls on a Weekend, Friday will be used.*
*Next : If Calculated Due Date falls on a Weekend, Next Monday will be used.*
*Split : If Calculated Due Date falls on a Saturday, Friday will be used. If Calculated Due Date falls on a Sunday, Next Monday will be used.*
*Prev : If Calculated Due Date falls on a Holiday, Friday will be used.*
*Next : If Calculated Due Date falls on a Holiday, Next Monday will be used.*
*Monday Next Otherwise: If Calculated Due Date falls on a Holiday which is on Friday, Next Monday will be used. Otherwise, Thursday will be used.*
Setting up Booking Period

To add a booking period:
- Click on to create a new line.
- In Booking Period Name, enter the name of this booking period.
- In Booking Period Name2, enter the 2nd name of this booking period.
- In Period Start Date, select the start date of this booking period.
- In Period End Date, select the end date of this booking period.
- In Year, enter the year of this booking period.
- In Period Type, select the period type. It can be either Month, Year or Quarter Month.
- Click to confirm creation.
- To edit booking period details after creation, Click to edit.
Browse More
- Overview
- Introduction and Navigation
- Quick Links
- Trading : Physical Deal Entry
- Trading : Paper Deal Entry
- Trading : Vessel Deal Entry
- Trading : Contract Fees
- Trading : Contract Specification
- Trading : Internal and Inter-entity Deal Entry
- Trading : MTM Groups
- Trading : Approvals
- Trading : Attachments
- Operations : Transaction Update
- Operations : Matching Buy/Sell Deal (Box Version)
- Operations : Matching Buy/Sell Deal (Table Version)
- Operations : Fees
- Operations : Specification Adjustment
- Operations : Inventory
- Operations : Letter of Credit
- Accounting : Fees
- Accounting : Settlement and Invoicing
- Risk Management : Strategies
- Risk Management : Valuations
- Risk Management : RM Dashboard Profit and Loss
- Risk Management : RM Dashboard Price Exposure
- Credit : Credit Exposure
- Credit : Companies
- Price Data : Prices
- Price Data : Price Series
- Price Data : Forward Curves
- Price Data : Exchange Rates
- Price Data : Formulae
- Price Data : Setup
- Reference Data : Accounting
- Reference Data : Books
- Reference Data : Calendars
- Reference Data : Commodities
- Reference Data : Container
- Reference Data : Credit
- Reference Data : Currencies
- Reference Data : Event
- Reference Data : Fee Type
- Reference Data : GT and C
- Reference Data : Incoterms
- Reference Data : Location
- Reference Data : Shipping
- Reference Data : Specification
- Reference Data : Tax
- Reference Data : Units