To add a new commodities go to Reference Data and then to the Commodities tab.
Commodities are required to be setup in order to enter a deal in the system. Commodities can be setup to default pricing items, fees and specification when the related commodities is selected in a contract.
Adding Commodities
Setting up Contract Commodity Groups
Adding Commodities
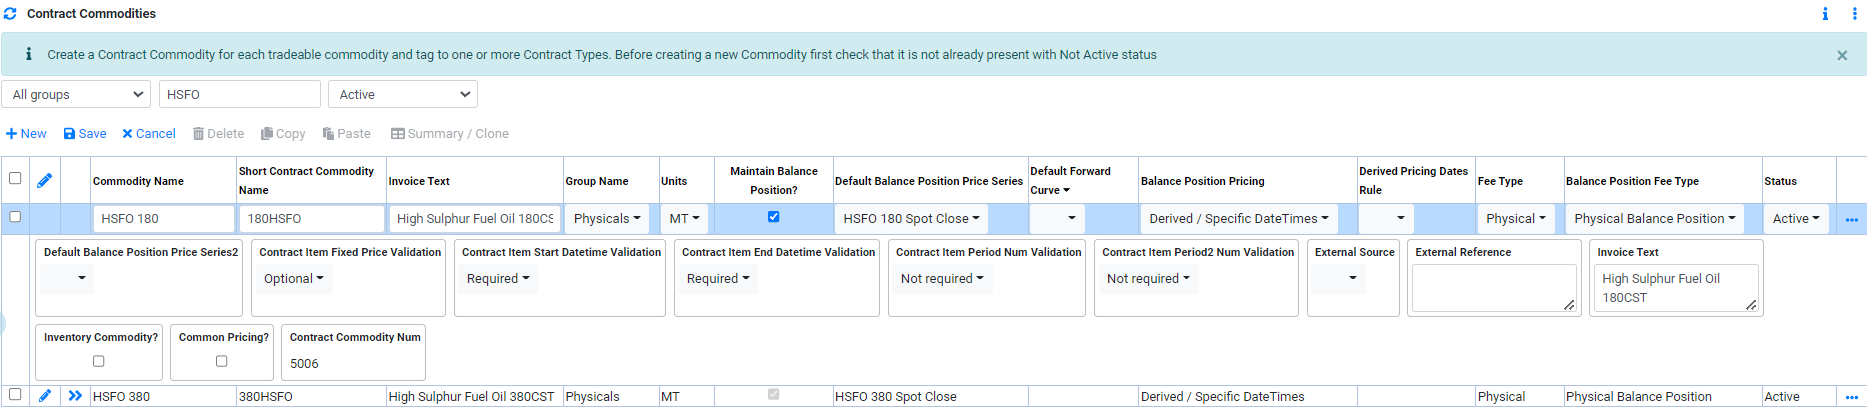
To add a commodities, in Contract Commodities view:
- Click on
 to create a new line.
 - In Commodity Name, enter the name of the commodity.
- In Short Contract Commodity Name, enter applicable short name of the commodity. This is used in Trading Contract Commodities list. Typically, this short name can be used in reports.
- In Invoice Text, enter the name that can be used when printing an invoice from the system.
- In Group Name, select the applicable group name for the commodity. The group name typically are Physicals, Swaps, Futures, Diffs, CFDs, Cargo Fees and Derivative Fees.
- In Unit, select the unit to be used for this commodity.
- In Maintain Balance Position?, tick the box if balance position should be maintained for this commodity. For Physical and Futures commodity, this will need to be checked.
- In Default Balance Position Price Series, select the price series to use when displaying the balance position in valuation.
- In Default Forward curve, select the Forward curve to use related to this commodities. When a Forward curve is selected, in valuation the commodities will use the select forward curve prices to mark-to-market to the position.
- In Balance Position Pricing, select the applicable Balance Position Pricing for this commodity. Typically, for physical it will be "Derived/Specific Date Times" and for futures it will be "Price Period Expiry". For Swap Commodity, this is not required.
- In Derived/Specific Dates Rule, select the applicable "Derived/Sepcific Date Rule" for this commodity. This is required when "Derived/Specific Date Times" is used in Balance Position Pricing.
- In Fee Type, select the applicable fee type for this commodity. The fee type will be used and display in valution results.
- In Balance Position Fee Type, select the applicable Balance Position Fee Type. "Physical Balance Position" for Phsyical and "Future Balance Position" for Futures. This is not required for Swap commodities.
- In Status, select the status of the commodities. Set to "Active" in order for the commodity to be available for selection in contract entry.
- In Default Balance Position Price Series2, select applicable default 2nd Balance Position Price Series. This is required when setting up diff swap as a commodity. Contact CoreTRM support if needed.
- In Contract Item Fixed Price Validation, this is used to set validation on contract item "Fixed Price" when entering a contract. For Physical, this is "Optional". For Swap, this is "Required". For Futures, this is "Required".
- In Contract Item Start Datetime Validation, this is used to set validation on contract item "Start Date" when entering a contract. For Physical, this is "Required". For Swap, this is "Required". For Futures, this is "Not Required".
- In Contract Item End Datetime Validation, this is used to set validation on contract item "End Date" when entering a contract. For Physical, this is "Required". For Swap, this is "Required". For Futures, this is "Not Required".
- In Contract Item Period Num Validation, this is used to set validation on contract item "Period" when entering a contract. For Physical, this is "Not Required". For Swap, this is "Not Required". For Futures, this is " Required".
- In Contract Item Period2 Num Validation, this is used to set validation on contract item "Period2" when entering a contract. The is required if the commodity setup is a Diffs.
- In External Source, select applicable external source for this commodity. This is for information only.
- In External Reference, enter applicable external reference for this commodity. Typically, this is used to identify a commodity from another external system.
- In Common Pricing, this is used frequently for commodities that are setup as Diff. For Example, Platts Dated Brent VS ICE Brent Future 1st Line. In a Diff commodities, 2 underlying price series will be involved. When Common Pricing is set to True, the pricing dates used for both underlying price series will follow the same pricing dates. For example, when pricing Dated Brent vs Brent 1st Line for May24, if Dated Brent has a public holiday on 27th May but not for ICE Brent Futures, the pricedates used will exclude 27th May for both price series.
- Click
 to confirm creation.
 - To edit commodities details after creation, Click
 to edit.
Balance Position refers to remaining position that has yet to be bought/sold when you are long/short in the market.For Example, When you bought 1,000 BBL of Crude, you will have a balance sell position of 1,000 BBL of Crude until you made a deal to sell the crude.
Derived/Specific Date Times: when this is used, the system will use start date/end date of the contract to generate the balance position pricing date of the commodity.
Price Period Expiry: when this is used, the system will use the "expiry period" available in the price series to generate the balance position pricing date of the commodity. For example, for Futures price series, it will use the expiry period setup here.
Price-In Pricing Dates:when this is used, price-in effect will be taken into consideration for the Physical Balance Position of the contract.If the pricing date is before the valuation date, the system will use the actual price for that pricing date and exposure quantity will be set to zero for that pricing date.
Pushing Pricing Dates Forward(Default):when this is used, the pricing date for the Physical Balance Position will be moved relative to the valuation date and thereby pushing the dates in every valuation run. The exposure quantity will also be always with the prorated amount.
Some key information is required to be entered in order for the deal to be value correctly. Step 16 to 20 are the validation setting available."

*This setup is optional. If this commodity has specific unit conversion other than the default unit conversion setup in Reference Data, you can setup the specific conversion factor here.*
*The system will first use commodity specific unit conversion before using unit conversion setup in Reference Data.*
To add a commodities, in Unit Conversion view:
- To create a new unit conversion, click on to create a new line.
- In Conversion Factor, enter the conversion factor to use.
- In From Unit, select the applicable From unit.
- In Conversion Unit Code, select the applicable To unit.
- Click to confirm creation.
- To edit unit conversion after creation, Click to edit.

To add a commodities, in Contract Types view:
- Click on to create a new line.
- In Contract Type, select the applicable contract types for this commodity. Once contract types are assigned, this commodity will be available in the dropdown list of contract entry commodities list when this specific contract types are selected. Commodity can be assigned to multiple contract types.
- In Active?, tick this box to set the contract types active.
- Click to confirm creation.
- To edit contract type after creation, Click to edit.
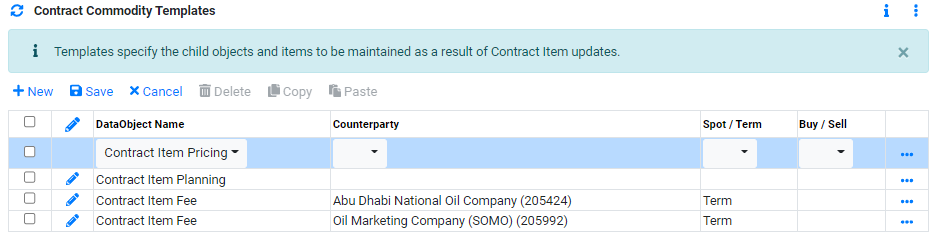
*This setup is optional. On contract creation, if there are specific pricing terms, specification or fees that requires defaulting, a contract commodity template can be sued.*
To add a commodities, in Contract Template view:
- To create a new commodity template, click on to create a new line.
- In DataObject Name, select the dataobject name that required defaulting.
- In Counterparty, select a counterparty if applicable.
- In Spot/Term, select spot or term if applicable.
- In Buy/Sell, select buy or sell if applicable.
- Click to confirm creation.
- To edit contract template after creation, Click to edit.
Contract Item Pricing : this is used to default pricing terms. For example, specific Pricing Series.
Contract Item Fee : this is used to default fees. For example, specific fees such as insurance.
Contract Item Specification : this is used to default specifications. For example, API or Suplur.
When a counterparty is selected, the system will only trigger the defaulting when the selected counterparty is used in contract entry.
When Spot or Term is selected, the system will only trigger the defaulting when Spot or Term is used in contract entry.
When Buy or Sell is selected, the system will only trigger the defaulting when Buy or sell is used in contract entry.
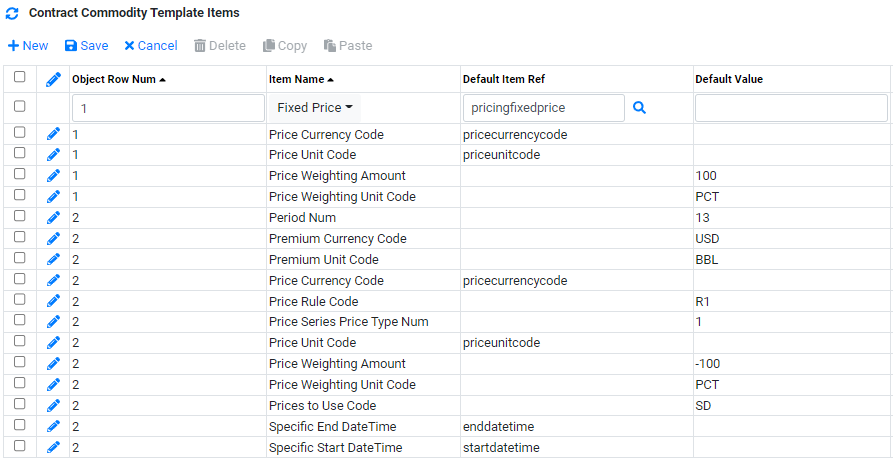
*This setup is required if you have added a contract template.*
To add a commodities, in Contract Template Items view:
- Click on to create a new line.
- In Object Row Num, enter the row num for which the default should use. Typically, it will be 1 and subsequently incrementing every new line by 1.
- In Item Name, select the item that required defaulting. Sometime the system required more items to be defaulted inorder for the system to create the defaults. Refers to existing contract template items in other commodities to check the minimum items needed.
- In Default Item Ref, select the Item Ref if it is applicable. Item Ref refers to value that is already exist in the system that you can reused.
- In Default Value, enter a default value if it is applicable.
- Click to confirm creation.
- To edit contract template item after creation, Click to edit.
*Contact CoreTRM Support if you need help to create Contract Commodity Template and Items.*
Setting up Contract Commodity Groups

This setup should have been predefined. *If you wish to make change this setup, please contact CoreTRM support before making any changes.*
To add a Commodity Group:
- Click on to create a new line.
- In Contract Commodity Group Name, enter the commodity group name.
- In Transaction Quantity Requires Actual Indicator, tick this box if this commodity group requires transaction quantity indicator.
- In Transaction Effective Start DateTime, select the Transaction Effective Start Date Time.
- In Transaction Effective End DateTime, select the Transaction Effective End Date Time.
- In Commodity Group Type, select the Commodity Group Type.
- In Auto MTM Rule, select the applicable Auto MTM Rule if required.
- Click to confirm creation.
- To edit contract commodity group after creation, Click to edit.
Browse More
- Overview
- Introduction and Navigation
- Quick Links
- Trading : Physical Deal Entry
- Trading : Paper Deal Entry
- Trading : Vessel Deal Entry
- Trading : Contract Fees
- Trading : Contract Specification
- Trading : Internal and Inter-entity Deal Entry
- Trading : MTM Groups
- Trading : Approvals
- Trading : Attachments
- Operations : Transaction Update
- Operations : Matching Buy/Sell Deal (Box Version)
- Operations : Matching Buy/Sell Deal (Table Version)
- Operations : Fees
- Operations : Specification Adjustment
- Operations : Inventory
- Operations : Letter of Credit
- Accounting : Fees
- Accounting : Settlement and Invoicing
- Risk Management : Strategies
- Risk Management : Valuations
- Risk Management : RM Dashboard Profit and Loss
- Risk Management : RM Dashboard Price Exposure
- Credit : Credit Exposure
- Credit : Companies
- Price Data : Prices
- Price Data : Price Series
- Price Data : Forward Curves
- Price Data : Exchange Rates
- Price Data : Formulae
- Price Data : Setup
- Reference Data : Accounting
- Reference Data : Books
- Reference Data : Calendars
- Reference Data : Commodities
- Reference Data : Container
- Reference Data : Credit
- Reference Data : Currencies
- Reference Data : Event
- Reference Data : Fee Type
- Reference Data : GT and C
- Reference Data : Incoterms
- Reference Data : Location
- Reference Data : Shipping
- Reference Data : Specification
- Reference Data : Tax
- Reference Data : Units