Contract Approval and Approval Setup
Once a contract is entered into the system, Approval are required.
To approve a contract go to Trading and then to the Physical/Paper/Chartering -> Contract tab.
Approving Contract

All contract entered into the system will start with Approval Status "Proposed". The next Approval Status is "Awaiting Approval" which is initiated by the user who request for approval. When the contract is in "Request for Approval" status, only the Approver can approve/reject a Contract. Once the Approver approve the contract, the final Approval Status is "Approved".
When a contract is in "Approved" Status, technically no changes can be made to the contract. However, some fields are still able to be changed. In order to be able to made changes to all fields in the contract after approval, the user will need to click on  to unlock the contract.
Once the user click on , the contract status change to "Unlock". In order to approve the contract again, the full process of approval will need to be initiated again.
To approve/reject a contract, in contract view:
- Select the contract that you wish to approve by checking the box in first column.
- Click on
 button at the top of the contact view.
 - Once the contract is in "Awaiting Approval" status, the Approver can now either approve or reject the contract.
- The approver can approve the contract by selecting the contract and click on
 or
or  button at the top of the contact view.
*Approval permission is required for clicking button.*
*Approval permission is required for clicking or button.*
To unlock a contract for amendment, in contract view:
- Select the contract that you wish to unlock for amendment by checking the box in first column.
- Click on button at the top of the contact view.
*Approval permission is required for clicking button.*
To setup contract approval go to Security and then to the Trading Security -> Approvals -> Approval Rules tab.
*Security permission maybe required to setup Contract Approval.*
Setting up One Level Approval
Setting up Multi Level Approval
Setting up One Level Approval

To setup up one level approval, in Approval Rules view:
- Click on
 to create a new line.
 - In Book, select the applicable book in which you wish to setup the approval.
- In Contract Type Group, select the applicable contract type group. The group are either Physical or Derivative.
- In Type, select the applicable type. In our example, we are setting up contract approval.
- In Sub Type, this is used for multi level approval setup.
- In Team, this is used for multi level approval setup.
- In Group, this is used for manually selecting the next approver(applicable for some client only).
- Click
 to confirm creation.
 - To edit approval rule details after creation, Click
 to edit.
In CoreTRM, approval are setup by book, contract type group and type. If all book in the system is to have same approval rules, the higher hierachy book can be used. Once a higher Hierachy book (parent book) is used, all sub book (child book) under this parent book will have same approval rules.
In CoreTRM, for the same book, you can setup different approval rule for physical or derivative.
For Fee Approval, please contact CoreTRM Support.
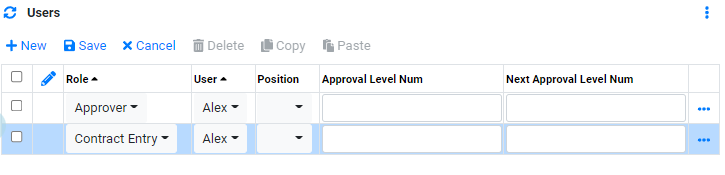
To setup up one level approval, in Users view:
- Click on to create a new line.
- In Role, select the applicable role.
- In User, select the user who is assigned to this role.
- In Position, this is used for multi level approval setup.
- In Approval Level Num, this is used for multi level approval setup.
- In Next Approval Level Num, this is used for multi level approval setup.
- Click to confirm creation.
- To edit approval user details after creation, Click to edit.
Contract Entry: this role for the user who has permission to click on "Awaiting Approval" and "Unlock for Amendment".
Approver: this role for the user who has permission to click on "Approve" and "Reject".
In other word, if an user is supposed to be able click both "Awaiting Approval" and "Approve"/"Reject" button, this user will need two row of entry in this table: one row for role "Approver" and one row for role "Contract Entry".
If your company uses one level approval, then most user will be added here with either "Approver" or "Contract Entry" role or both.
Setting up Multi Level Approval

Multi level approval is mainly setup based on a team structure in CoreTRM.
To setup up multi level approval, in Approval Rules view:
- Click on to create a new line.
- In Book, select the applicable book in which you wish to setup the approval.
- In Contract Type Group, select the applicable contract type group. The group are either Physical or Derivative.
- In Type, select the applicable type. In our example, we are setting up contract approval.
- In Sub Type, select the applicable sub type conditions for the approval rules.
- In Team, select the applicable team. When a team is used, all the user setup in that team will be user with contract entry role permission.(Rights to click on button.
- In Group, this is used for manually selecting the next approver(applicable for some client only).
- Click to confirm creation.
- To edit approval rule details after creation, Click to edit.
In CoreTRM, approval are setup by book, contract type group and type. If all book in the system is to have same approval rules, the higher hierachy book can be used. Once a higher Hierachy book (parent book) is used, all sub book (child book) under this parent book will have same approval rules.
In CoreTRM, for the same book, you can setup different approval rule for physical or derivative.
For Fee Approval, please contact CoreTRM Support.
The sub type that can be used are "Spot","Term","Term(~1yr)","Term(1yr~)" and "Derivative".
"Spot" refers to when this contract is a spot contract, approval process will follow this rule.
"Term" refers to when this contract is a term contract, approval process will follow this rule.
"Term(~1yr)" refers to when this contract is a term with contract period is less than 1 year, approval process will follow this rule.
"Term(1yr~)" refers to when this contract is a term wtih contract period is more than 1 year, approval process will follow this rule.
"Derivative" refers to when this contract is a derivatives contract, approval process will follow this rule.
If your condition does not appear in the list, please contact CoreTRM Support.
*Team are setup below.*
Setting up User Team
To setup user team go to Security and then to the Trading Security -> Approvals -> User Team tab.

To setup up user team, in User Team view:
- Click on to create a new line.
- In Team, enter the name of the team.
- Click to confirm creation.
- To edit user team details after creation, Click to edit.

To setup up user team, in User view:
- Click on to create a new line.
- In User, select the user(s) belonging to this team.
- Click to confirm creation.
User setup under a team will have the rights to click on and button.

To continue setting up multi level approval, in Users view:
- Click on to create a new line.
- In Role, select the applicable role. In multi level approval setup, only "Approver" role is used.
- In User, this is not used for mutli level approval.
- In Position, select the position that is assigned for approval.
- In Approval Level Num, enter the approval level num. For Example, 1 is the first approver and 2 is the 2nd approver.
- In Next Approval Level Num, enter the next approval num. This is used to indicate the next approver after this approver has approved the contract. For Example, on the line with Approval Level Num 1, indicate 2 for Next Approval Level Num to tell the system that after this approver, the next approver is level 2.
- Click to confirm creation.
- To edit approval user details after creation, Click to edit.
Approver: this role for the user who has permission to click on and .
User Position are setup in Security Data -> Security Model -> User Positions.
After User Position are created, you can go to security model -> User to assign each user with its positions.

Browse More
- Overview
- Introduction and Navigation
- Quick Links
- Trading : Physical Deal Entry
- Trading : Paper Deal Entry
- Trading : Vessel Deal Entry
- Trading : Contract Fees
- Trading : Contract Specification
- Trading : Internal and Inter-entity Deal Entry
- Trading : MTM Groups
- Trading : Approvals
- Trading : Attachments
- Operations : Transaction Update
- Operations : Matching Buy/Sell Deal (Box Version)
- Operations : Matching Buy/Sell Deal (Table Version)
- Operations : Fees
- Operations : Specification Adjustment
- Operations : Inventory
- Operations : Letter of Credit
- Accounting : Fees
- Accounting : Settlement and Invoicing
- Risk Management : Strategies
- Risk Management : Valuations
- Risk Management : RM Dashboard Profit and Loss
- Risk Management : RM Dashboard Price Exposure
- Credit : Credit Exposure
- Credit : Companies
- Price Data : Prices
- Price Data : Price Series
- Price Data : Forward Curves
- Price Data : Exchange Rates
- Price Data : Formulae
- Price Data : Setup
- Reference Data : Accounting
- Reference Data : Books
- Reference Data : Calendars
- Reference Data : Commodities
- Reference Data : Container
- Reference Data : Credit
- Reference Data : Currencies
- Reference Data : Event
- Reference Data : Fee Type
- Reference Data : GT and C
- Reference Data : Incoterms
- Reference Data : Location
- Reference Data : Shipping
- Reference Data : Specification
- Reference Data : Tax
- Reference Data : Units